Mystique, a white 1996 Dodge Intrepid, with her hood popped and engine components exposed

Welcome to

↝ ⭒ GARAGE ✯ MYSTIQUE ⭒ ↜

This garage is maintained by:

Xtine

Mystique, a white 1996 Dodge Intrepid, with her hood popped and engine components exposed

MEET THE FLEET

About The Car

Mystique is a white 1996 Dodge Intrepid with a Chrysler 3.5L V6 engine. She is one of the "cab-forward" cars that were produced by Chrysler in the 90s, along with the Chrysler Concorde, Chrysler LHS and Eagle Vision. The body takes styling cues from the Lamborghini Portofino concept car that was made when Chrysler owned Lamborghini in the '80s, but its engineering, with the longitudinally mounted V6 engine and front-wheel drive transaxle, came from the Renault 25, whose design DNA passed to the AMC Premier to Chrysler once Chrysler acquired its engineering team in the buyout.
Mystique is the second car I've owned. I found her in November 2025, after my previous car died at 180,000 miles of old age and a bad alternator (as well as his 67 other codes).
She was previously owned by an old man who owned a used car dealership before he passed, and then she went up for auction at his estate sale. When we found her, she only had 82,000 miles on her.
Now, I am Mystique's driver, and she is my ride. Join us, and let's see where she takes us!


About The Bike

Diamond is a purple 7-speed beach cruiser bicycle that I found at a junkyard.
She is a diamond in the rough - emphasis on "rough"! I originally found her while looking for a back wheel for another bike at a junkyard (you can find the whole story here.
Long story short, you can definitely tell she's from the junkyard, despite the new chain and derailleur I put on her. She shifts wrong, her chain falls off of her cassete and her chainring (sometimes both!), and her basket is one that I cannibalized from another bike. Rough indeed.
My goal for her is to turn her into a commute-worthy E-bike using a free hoverboard I got from a garage sale. It won't be easy, but I'm hoping with enough pressure-testing, I can press this lump of coal into a brilliant and shining diamond.

About The Motorist

Hi! I'm Xtine. I'm a musician, fashionista and amateur car enthusiast.

I was introduced to the world of cars by my friend A-dawg. She helped me out a lot when it came to picking out Mystique - we were riding in her tricked-out VW Beetle to different vehicles we found on Facebook Marketplace, but once we saw Mystique, A-dawg stopped her car so we could take a look. From that day on, Mystique and I were in love.

My goal is to make Mystique look as beautiful as me (and to make her more fuel efficient), and show everyone that just because you're a baddie doesn't mean you're easy to rip off at the mechanic shop LOL


Far side angle photo of Mystique, a white 1996 Dodge Intrepid, bathing in the sunlight

BLOG

Far side angle photo of Mystique, a white 1996 Dodge Intrepid, bathing in the sunlight

SATURDAY-MONDAY 6/6/2026-6/8/2026

Previously on ↝GARAGE ✯ MYSTIQUE↜...

Mystique and I travel to Franklin, Ohio to repair her tie rods with my friend A-Dawg. We end up making a 3-day detour in the Kingdom of God.

PART 2


There is only one thing to say when you wake up soaked in yesterday's grime, last night's sweat, and a lifetime of low-self esteem compounded into a failed tie rod job. There's only one person to blame when the day immediately starts off shitty.
"Today is the day that the Lord has made."
But today, I said to myself, today would be different. Today, I would get that tie rod separated and get the new tie rod end on, so that I can go back home! Unfortunately, everything I had tried yesterday did not work - so there was only one more thing to try.
Fire.
A-Dawg was still asleep with her boyfriend, and she was very, VERY clear that she was not to be disturbed. I don't blame her - in her position, I would be the exact same way. Unfortunately, that left me with few options to buying a blowtorch, unless I could hitch a ride with someone who was already going to go into town.
Then I realized - it's Sunday! People would be going to church, including Kim and Taz. Like gracious neighbors, they let me wash up and get ready to go to church with them - they would be going to Walmart anyway to pick up new inner tubes for their bike, so it would all work out. As Taz's Yu-Gi-Oh played on the TV in the living room, I wiped off as much grease off of my body as I could and donned the orange sundress I was going to wear for Cars and Coffee, and we set off for church.
Taz and Kim's church is a one-room schoolhouse of a church - a tiny little country church, intimate like a grandmother's embrace. Upon entering, I was given a hug by a lady in the pew ahead of us only known as "Grandma." And another hug from another sister. And another. And another. This church had no shortage of space - not in terms of love.
As we settled down, the pastor came up (wearing a Jimmy Buffet shirt - there's always one of those guys at a church) and greeted us all in his booming voice. God clearly gave him gifts - of gab being chief among them. After some countrified version of some church songs I knew, he launched into his sermon about 1 Corinthians 16:13 - 14 - "Be watchful, stand firm in the faith, act like men, be strong. Let all that you do be done in love." From the behavior of the people of that church, I could tell they understood that last lesson well.
After church, Taz and Kim took me to Walmart's, where I got a blowtorch to try on the car. They themselves got two inner tubes (the European ones - 700cc) and we went back home and had some lunch. Then, it was off to work for me.
First thing I did was re-attach the tie rod to the steering rack, to have something solid to hold the tie rod as I tried to twist it. Then, came the heat.
The propane torch I got was just a normal one you'd use to solder pipe fittings for plumbing, and more than enough for most normal rust. I say normal rust because this rust that I had was not normal. It must have been paranormal - the devil himself must have pissed on this thing, it was so corroded.
I tried PB Blaster. I tried the torch. I tried both. I tried it a million times. And then - it started twisting! And stopped. So I did it again. And again. And again. Taz brought me a bottle of water. Ernest came out and brought me a big bottle of juice. It didn't matter. By hour 2, I had twisted the outer tie rod only an eighth of a turn. By hour 4, it was a quarter turn out. By hour 7, the tie rod was only half of a turn out and the only thing that would budge anymore was the entire steering rack assembly. Obviously, the steering rack was not as stable as I thought, so I took the tie rod off of the steering rack, took my vice clamps and clamped it to a fence. But stupid me, thinking it would work - the vice clamp started getting bent.
I can't do anything. Everything was fucking useless. Not even A-Dawg, coming back from her picnic with her boyfriend, could help me. All she could offer were her condolences - maybe her options wouldn't be so deprived if I weren't. Useless. Useless. Useless.
One of the other neighbors, Rian, came back to the apartments to me smoking a cigarette and looking bummed out. "Got that tie rod out yet?"
"No."
"Listen, I work at a bowling alley. I could help you separate those tie rods. I'll put it in the vice clamp at work and twist it apart."
What could I say but yes? What could I do but nothing else? What could I entertain but the angel before me?
I gave him the tie rod, as well as my new outer tie rod end, and he went to work. 3 hours, many words of encouragement from A-Dawg, Kim and Taz, and a hearty dinner of rice and beans from Kim later, Rian came back. The tie rods ends were in each of his hands - he had done it! Unfortunately, the tie rod was so stripped that it was impossible to put the new tie rod on - he had ended up stripping the outer tie rod thread. Still, the tie rod was separated! I would just need to go to the parts store tomorrow to get a new tie rod.
This is the day the Lord has made. That much is the truth. This shitty, messed up waste of a day - this day that started low, that brought me low, that made me realize how useless I am - it's God's fault. It's God's fault that my tie rods are fucked up. It's God's fault that my car is fucked up. It's God's fault that I'm fucked up.
It's God's fault, as well, that I was fed and given water by my neighbors. His fault that I was embraced among so many believers. His fault that my neighbor could separate my tie rods. His fault that A-Dawg helped me get this car, and inspired me to fix it up instead of letting it die like my old car. His fault that because of Mystique, I've become convicted to restore her and expand my knowledge.
Yes, I'm useless. This is the day that the Lord has made. All I can do is rejoice, and be glad in it.
PART 3 COMING SOON!

PART 1


"Be thankful in all circumstances, for this is God’s will for you who belong to Christ Jesus." - 1 Thessalonians 5:18.

I sure have a lot to be thankful for, God. For getting stranded in the boonies of Franklin, Ohio. For missing work as a result. For having my car die just as I was supposed to leave.
I sure am thankful, God. Real thankful. So let me start going down the list of things I'm thankful for.
First, I'm thankful that my friend A-Dawg hit me up again after a million zillion years to work on each others' cars. She hadn't talked to me for a while - of course, because she's busy with school. Of course.
The week before, I told her that I was going to do my tie rods - the very last thing that was wrong with Mystique when I got her. From the beginning, her alignment was super off, and the bushing disintegrating slowly but surely just exacerbated things. To my surprise, she agreed - she had her boyfriend Thomas visiting, but she would make some time for me. I knew I was in good hands then.
Second, I'm thankful that I missed Dayton Cars and Coffee. The morning started off with a bang - several loud ones at my door, along with the smell of smoke coming from below. I opened my door to two big, burly men - unfortunately for me, completely covered up so no skin was showing. It was the fire department, and they were looking for the source of that smoke smell in the apartment. They let me go back to bed (too bad... I wouldn't mind if they joined me >:D), but the damage was done; my beauty sleep was ruined and by the time I woke up, it was too late to get to Cars and Coffee like I planned. Instead, I drove by as all the cool cars drove away from the gigantic parking lot it was in. All of the pristine Corvettes, slammed BMWs, vintage hot rods... it was like seeing a shimmering school of exotic fish pass by while you're snorkeling. Pure magic.
Third, I'm thankful that A-Dawg got a boyfriend. When I was living with her as her roommate, her place was... decent, but disorganized. It was 70% the neighbors' fault (they have a massive cockroach problem they refuse to take care of) and 30% her having bigger fish to fry, like her fuckass classes that she has to drive a million miles up the highway to, her fuckass VW Beetle that keeps breaking down so she can't drive up the highway to, the fuckass mechanic shops who don't want to hire her because she's a girl (hence the aforementioned fuckass classes), her fuckass fast food job, her fuckass bills, her fuckass ex-boyfriend, her fuckass messy roommate, etc.
Now that she's finally got a guy, though, the apartment was noticeably cleaner. There were no longer dozens of cockroaches scurrying around from the neighbors' side of the wall - only maybe three or four at a time. The fridge and the cupboards were neat and organized. The guest bathroom was spotless (a far cry from how I had it when I was using it). Even she looked a lot better put together - she greeted me with that glow that lets me know she's enjoying having a boyfriend. After some pleasantries and loaves of homemade sourdough bread were exchanged, we got changed into our mechanics' clothes (or I did - her boyfriend woke up and they started getting all lovey dovey, so I had to evacuate IMMEDIATELY before I got caught in the splash zone) and went downstairs to get started on the car.
On the way down, I greeted my old neighbors, Taz and Kim - my favorite old hillbillies. Taz was sitting outside smoking a cigarette and getting sunburnt as usual - "Hey chick! Haven't seen ya for a while!" "Same here! How've things been?" "Well, uh, y'know, uh... it's been..., uh, bangin'!" Taz is kind of a funny old guy. Or, to put it politically correctly, he is mentally challenged. He has a tendency to ramble, even if the conversation is better off ended - and I always feel bad about saying "Hey man, I have to get going so I can do this/that," but it's always for the greater good.
Today, though, I could afford to be a little lazier. We talked about what was going on in the neighborhood for a bit - about some robbery that happened, about the garden that Kim was trying to start, etc. After a bit, Kim came out to see what all the fuss was about, and immediately joined in on the fuss.
Kim is like that aunt who doesn't quite understand you but still loves you with all of her heart, so you can't help but love her back. She went out to show me her garden - right now, it consisted only of a tomato and a pepper plant, "but there's going to be a lot more soon," she promised.
Speaking of promises, I brought A-Dawg's gigantic 3-ton floor jack down to the parking lot, so that we could check out her car. As it turns out, her tie rods aren't able to be removed without taking out the whole assembly, which she didn't have, so we ended up not messing around with it. As for Mystique, we jacked up the front driver's side, took off the wheel, and got to work.
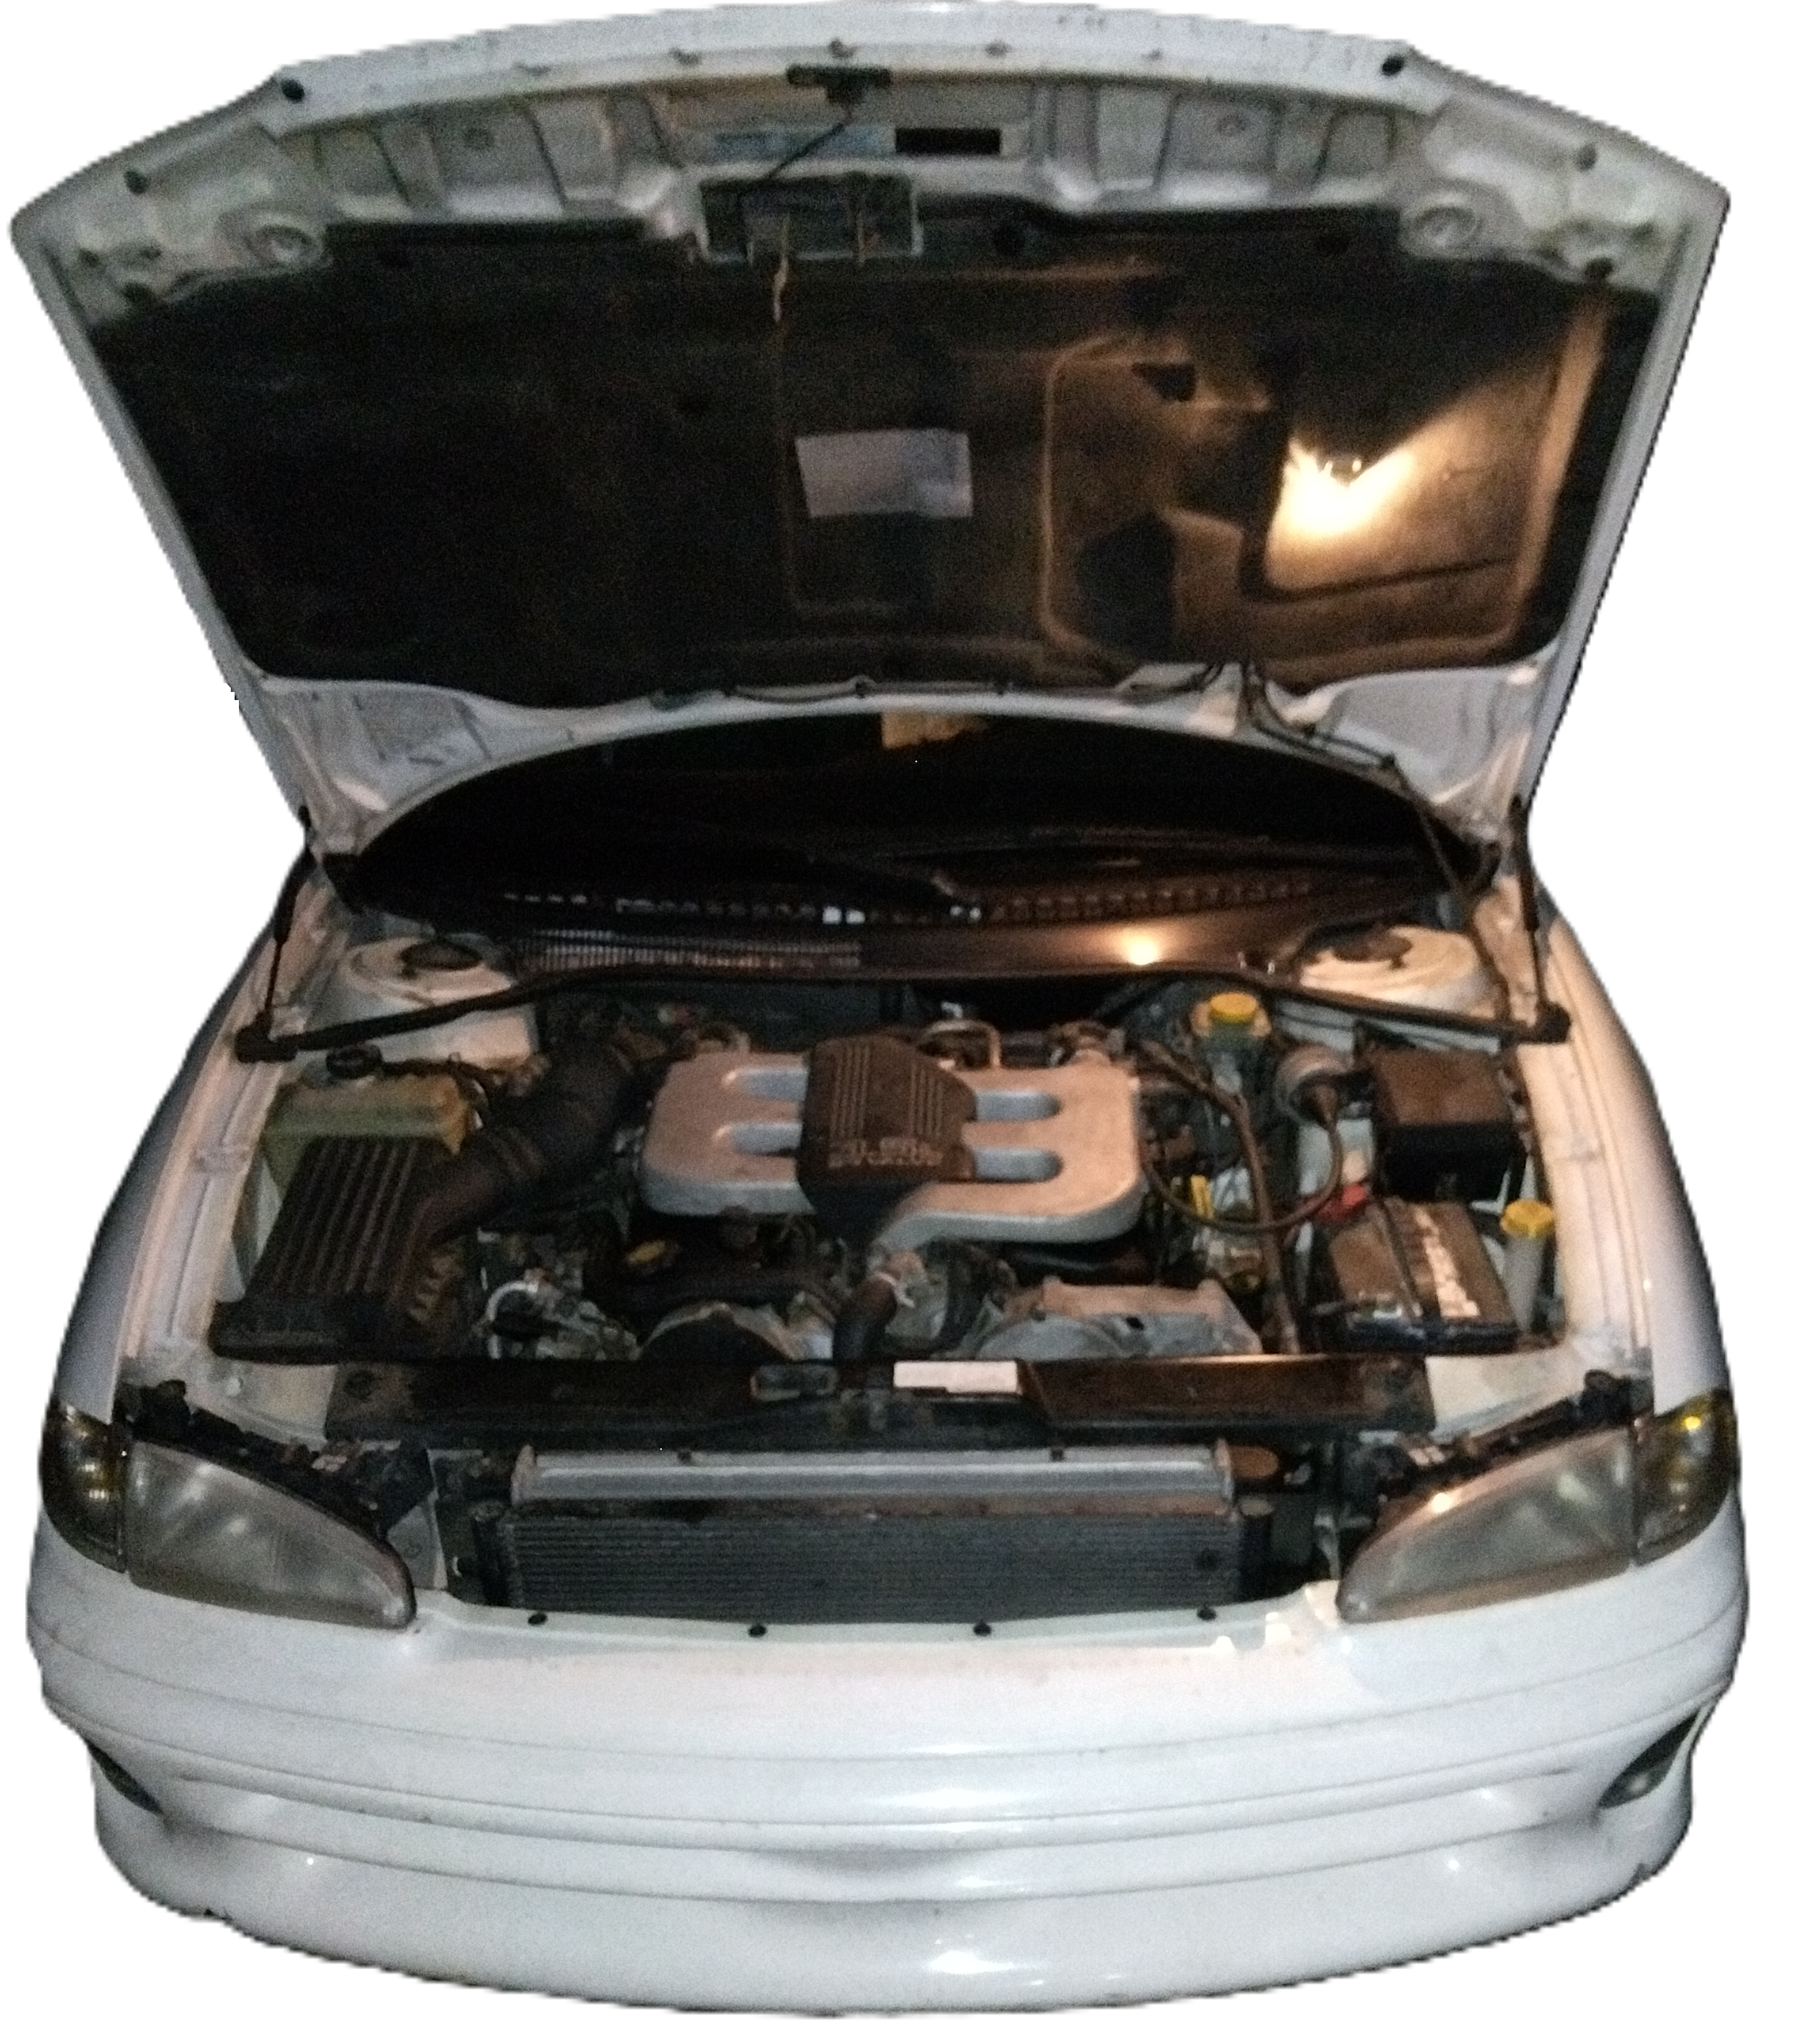
The first order of business: getting the nut off. The way the original tie rod was engineered is like this: the ball joint bolt on the outer tie rod end was super long, and the bolt was up against the strut rod super tight. The outer tie rod end was attached to an adjustment sleeve, which was attached to the inner tie rod end, which had an eyelet at the end with a bushing that attached to the steering rack.
The ball joint nut is 16mm in diameter. On most wrench sets (such as mine), the sizes go up as follows: 10mm, 12mm, 13mm, 14mm, 15mm, 17mm, 19mm. As you can see, there are two glaring omissions. Nobody cares about 11mm - I don't think I've ever met an 11mm bolt or nut ever. And even if I did, those kinds of bolts would probably be able to be broken by any old adjustable wrench anyway.
16mm, on the other hand, is for stuff that bears a load, like a suspension part. Which means it's tight, and you aren't able to take it off with an adjustable wrench without stripping it. Luckily, A-Dawg had a deep 16mm in her toolbox that connected to my breaker bar - which was good, because I definitely needed all the leverage I could get to break that nut loose. After that, I realized I needed to use an adjustable wrench to wrench the nut off, because the tie rod was designed so that it would spin the bolt around at a certain point - probably so that the ball joint doesn't accidentally unseat from the strut rod, which is smart in a way but also requires me to use an adjustable wrench to hold that nut down. A-Dawg let me borrow her wrench, and with the two of use working together, I cranked the wrench while she held the ball joint bolt in place with an 8mm socket. With the power of friendship and some PB Blaster, the nut came off in no time. The same, unfortunately, could not be said for the hold-down nut on the adjustment sleeve. That required a much, much bigger adjustable wrench. We also needed a grease gun for the new ball joints, and a pickle fork to take out the old ball joint.
So off A-Dawg and I went to the local parts store. We got a big adjustable wrench (with that generous parts store markup, of course) and a cheap-o grease gun so that we could grease the new ball joints we got, as well as a 90 degree grease gun coupler. We also rented a pickle fork to use on the ball joint. Unfortunately, when we got back, the cheap-o grease gun's original coupler proved to be impossible to remove, so we went back and I got another grease gun whose coupler could be switched out. As A-Dawg greased the new ball joints, I worked taking off the ball joint - I ended up having to cut the ball joint boot to make room for the pickle fork. Then, I hammered in the pickle fork to loosen the thing, and after a few tries, I finally got it off. Then, I had to attach the ball joint back to the strut rod again, so that the tie rod was stable enough for me to get rid of the hold-down nuts on the adjustment sleeve. I took my adjustable wrench and pulled - nothing happened. I put a bunch of PB Blaster on the nut and pulled - nothing happened. I took A-Dawg's gigantic 3 foot long cheater bar that came off of her floor jack - nothing happened. Finally, A-Dawg had enough of my struggling and gave the tie rod a good dunk in Kroil that she got from her airplane mechanic cousin.
While the Kroil took its sweet time penetrating, I decided to be useful. I had brought Diamond with me, so I took a little time to adjust her derailleur tension and braking. I thought of A-Dawg's mountain bike, too, and thought that it would be a good idea to get her bike up and running, since she likes to hike. Unfortunately, as I brought it out I realized it might be beyond repair. The front brakes were cut off to make room for the road bike wheel she put in the front to replace her old front wheel, whose inner tube had burst. Adia did not have the money to put in a new inner tube, so she just scrounged up a spare wheel from another bike and said "fuck it." Unfortunately, it probably rode like shit, which is why she kept it unused for so long both front and back derailleurs and chain practically ossified into a rust fossil. There was no saving it, but with a generous helping of WD-40, I at least got the chain to move around a little so she could move around in it a little bit.
Kim also needed her bike repaired - a handsome Schwinn Admiral cruiser with road bike wheels. There was some rust on it, so I cleaned it off with my metal wire brush and WD-40, and then cleaned off her derailleurs with the same setup so that it could shift again. After spraying the shifter with some WD-40 and adjusting the tension, it was good to go! All it would need now was new inner tubes.
Now that I felt fully useful, it was time to get that adjusting nut off. So, I took the big adjustable wrench. I took the 3 foot breaker bar on the end of it. I tightened the adjustable wrench. And I pulled. And then we pulled. And pulled, and pulled, and,
POP!
That's the sign that the nut broke. Or that it stripped beyond repair. Either way, the tie rod would need to be replaced, so I gave it a test twisting. It broke! So, full of confidence, I worked on trying the get the tie rod end off next.
After another few hours of waiting for the Kroil to set (during which time I cooked up some dinner with all of the pasta and sauce and other food Kim gave me), I tried the tie rod end. And tried, and tried and tried. But no matter what, it wouldn't twist.
At this point, it was getting dark, and there was no way I would get the job done in one day. But I could at least make some semblance of progress. I took off the engine plenum (and had A-Dawg's boyfriend time me - it took 20 minutes! A new record!), disconnected the coolant heater hose (making sure to catch the coolant) and disconnected the fuel lines (I got rid of the fuel pressure beforehand, so it didn't blast all over me). Now, I had access to the inner tie rods and steering rack.
The bushings that hold the inner tie rod to the steering rack were deteriorating - matter of fact, the driver's side bushing fell off completely as soon as I had taken off the plenum and starting messing around in the steering. I couldn't see where it landed until the next morning, however - it was hopelessly dark outside, and I had to take a flashlight and hold it in my mouth. Luckily, one of the other neighbors, Ernest, came out to just talk (he gets lonely at night with no one to talk to except his badass little dog named "C'mere" and his bottles of liquor). He handed me two snack pies and helped me hold my flashlight as I worked to get the tie rods off.
The tie rods are held onto the steering rack were 22mm, which made me glad that A-Dawg carelessly opened the new 22mm wrench I got to test it against the tie rod adjustment nuts instead of the new 21mm I had. All it took was unscrewing the nut (easier said than done! There was barely any room to do that, but at least it wasn't rusted like the suspension parts) and boom! The tie rod was off.
Now, it was time to separate the tie rod ends (because I, in my hubris, only bought the outer tie rod ends thinking I could reuse the inner tie rods and adjustment sleeves). But try as I might, there was no way to separate them. I put together some kind of contraption where the adjustment sleeve was held by one adjustable wrench, the outer tie rod end was held by another and a cheater bar, and I braced the adjustment sleeve to the ground while pulling on the outer tie rod end. All that did was strip the adjustment sleeve.
So, defeated, I gave up for the night. That night, Kim brought out some weed and we smoked and chilled out until the night got cold. At the end of the night, I climbed into Misty, reclined the seat, and dozed off, happy, knowing that no matter if I got out of Franklin on my own four wheels or not, I was home.
PART 2 COMING SOON!

SUNDAY 5/31/2026

Previously on ↝GARAGE ✯ MYSTIQUE↜...

We will see the harvest of the seeds we sowed all month long. Misty gets her first true test since her valve cover gasket replacements - see you in Cincy!

As a kid, I always loved that one Christmas movie, "Home Alone." I felt just like McCauley Culkin's character - I get to do whatever I want in my parents' place! Isn't that the dream? To take what your parents have built up and do with it what you want? Of course, I would leave everything as I found it - I wouldn't want them to know I messed with anything, especially not in the garage (although the dent in the car will be hard to explain). At least I didn't have to rig some booby traps for any freaky robbers like in Home Alone (although crazily enough, the week after I brought them back from the airport, some homeless guy did end up sneaking into their home, and he took some clothes and took a shower. Poor guy).

But now, this little vacation has come to an end, and it was time to pick my parents up from the airport. I didn't feel like taking one of their big SUVs, because I hate driving those big obnoxious gas guzzlers. I definitely wasn't going to take my dad's bougie used sports car, either - because a) driving it would make me feel like a rich asshole - if I was, I wouldn't be doing my own car repair, would I? I'd just take my car to the shop, b) my baba promised to skin me alive (kind of but not really) if he saw me driving it, c) it has a minor head gasket leak - my baba isn't the Crazy Rich level of Asian, just the normal upper-middle-class Model-Minority works-a-job-he-fucking-hates-and-therefore-buys-expensive-shit-so-he-can-feel-like-it's-all-worth-it-even-if-it's-broken level, d) the backseat is only for insurance purposes and wouldn't have enough leg room for a double-amputee, and e) because I already have a car I like to drive.

Now, Misty's not perfect just yet - her tie rod bushings are still way out of whack - but fortunately, the way the tie rods are engineered make them slipping off the wheel from the steering rack next to impossible. Even better, the wheel stabilizes on highway speeds, so it was going to be OK. What wasn't OK was the fact that my Bluetooth car radio thing that hooks up to my cigarette lighter broke, so John Galm's screaming was extremely muted. Looks like God really didn't want me to antagonize my parents any more than I already have with that dent.

Misty and I set off in the early morning to pick my parents up. Down we drove, South past the Dayton Mall, South past the Giant Jesus Statue off I-75 that's next to the gigantic flea market with the giraffe statues, past fields of corn, past Cincy, and to the Cincinnati Airport, which weirdly enough is actually in Kentucky.
At the departure gate, my mama came out of the building first, carrying a suitcase filled clothes and another filled with all sorts of Chinese goodies, snacks, and Buddhist temple souvenirs. The first thing she said when she saw me was "How can you pick me up in that piece of crap?" in Chinese. Thanks, Ma. How Buddhist of you.
Next came my baba. He also came carrying two big suitcases. In total, three of the suitcases fit in the trunk of my car (that I previously fixed the light switch for with a generous amount of JB Weld), one of them and a backpack fit in the front seat, and my parents fit very, very nicely in the back. Thankfully, baba was actually kind of excited to ride in the back - he wanted to try out the Dodge Intrepid's "cab-forward" design that he read about in Lee Iacocca's biography.
Baba knows a lot about cars - he loves how they look, how they sound, and how they make people gawk. He talked my ear off about how my car "used to be a Lamborghini!" (actually true) and about the history of the LH car platform. According to Lee Iacocca's biography (which he was quoting from the entire car ride back home), after Lee Iacocca retired, Chrysler was free to design pretty much whatever they wanted because they were rich after the success of the boring-ass K Cars. What resulted from this success was Chrysler buying up all sorts of rivals - AMC (which is why you see Jeeps being sold at the dealerships alongside Dodge and Chrysler) and even Lamborghini. Chrysler had Lamborghini design the Lamborghini Portofino, a concept sedan with Lambo doors in the front, backward (or "suicide") Lambo doors in the rear, and an engine in the middle. Chrysler loved it! Lamborghini hated it, and they called it the "big potato."
What followed next was the "new Dodge" - all of the ad campaigns talked about how Dodge had changed from the dowdy old K-Cars of the past. They were stylish! They were cool! They were free! They were achieving everything Lee Iacocca sacrificed for back in the 80s. In short - Dodge had achieved the American Dream.
After that, things fell apart. Chrysler sold themselves to Fiat. Their build quality (whic hwas never that great to begin with) got even worse. Then they were bought by Stellantis. And now, Dodge is like the kid who peaked in high school - their only personality is "muscle car." No more cool, stylish Lambo concepts. They are wasted potential.
And on that sobering note, I had to cut in on Baba's infodump to inform him that I put a dent in his car while testing my brakes. We were silent the rest of the ride home. Even Misty could sense the tension, because thankfully, that annoying wheel squeak from her broken tie rod bushings didn't happen for the rest of the ride.
Once we got back, Mama showed me the things she got from China. First, there were a lot of snacks that she got. Since I'm a vegan, she got me a ton of snack cakes from the Buddhist temples that were apparently blessed by the monks. She also showed me this necklace that she got from the Buddhist temple that's some kind of ghost-killing potion - it's supposed to protect you against evil spirits, but if it touches water it'll literally disintegrate because it's made of cinnabar, which is some kind of sandstone I think. And then she showed me all of the Buddhist temples where she bought "blessings" from the monks for the family's wellbeing and fortune. This solidifies my belief that China did to Buddha what Rome did to Christ - what Guy Debord called "recuperation."
But now, it was time to go back home - but at least I have an excellent (for the most part) car that I can go home in! Misty might not have been the best car when I bought her (at all), but because of the work I put in and the garage I could use from my parents, she's nearly perfect. To do what I need to do with what my parents have given me - to fulfill my purpose - that's what petsitting is all about. Now, Misty is well-equipped to take my friends and family places, as a car is supposed to do. And I'm glad, despite our differences, that my parents could help me fix my car in their own way.

NEXT TIME ON ↝GARAGE ✯ MYSTIQUE↜:
Mystique and I travel to Franklin, Ohio to repair her tie rods with my friend A-Dawg. We end up making a 3-day detour in the Kingdom of God.

TUESDAY 5/26/2026

Previously on ↝GARAGE ✯ MYSTIQUE↜...

Misty just can't seem to keep a cool head! We'll fix that with a new thermostat and radiator cap.
    TOOLS USED:
  • Drain Pan
  • Pliers
  • 13mm Socket and Wrench
  • 3/8ths Inch Wrench
  • RTV Gasket Maker
  • Milk Crate
  • 1/4th Inch Inner Diameter Hose
  • Empty Bottle
  • Rags
    PARTS NEEDED:
  • Thermostat
  • Thermostat Gasket
  • Radiator Cap
  • 2 Gallons of Coolant

Jack Up? ✖

A weekend of peace is what I needed after that 20 hour brake job and the chemical burns on my hands. A weekend of not having to worry about Mystique crapping out completely. The brakes were fresh; the coolant was filled; the fuel injectors were sealed; I even put new springs into her broken windshield wiper assembly so that she could actually wipe rain off the windshield.
Yes, I was calmed. I was confident. I was...cocky.
I decided to take Misty to the recycling center to dump all of my old fluids - I had about 10 jugs of nasty vanilla-smelling black coolant, 5 quarts of old black oil, and 2 12 oz bottles of old brake fluid. I couldn't have all of that crap taking up room in my parents' garage - especially since I was supposed to pick them up next week. To the recycling center we went!
Well, "went" would imply we actually were "going." It was more like "to the recycling center we waited in line for like half an hour." The road to the recycling center was lined up bumper to bumper with trucks, SUVs and minivans caked in grime and hauling thousands of pounds of junk. It was a LOT of idling we were doing. It was a hot day. My AC wasn't working. Heat waves came off of the cars in front of me. Sweat started beading on my forehead. The air started smelling salty and sweet. Steam started coming out of - steam???
Right out of the right side of Misty's engine bay - right where the radiator cap is. Shit.
I was at the middle of the line, too - there was no way I could turn back with all those trucks blocking me in. I could only watch helplessly as the coolant burst out of the engine bay in a white cloud and vanished. 5 dollars worth of coolant and distilled water, reunited with the water cycle. Except there would be no precipitation to return that water back to Misty's coolant system.
As I expected, she started overheating and I had no choice but to shut her off. In the middle of the line. I was starting to so close, too - I could smell the sweet, fermented trash wafting from the junkyard, but I had no way to get there to dump my stuff except by putting her in neutral and pushing her. It worked, until I got to - gasp - a slight hill. There was nothing - absolutely nothing - I could do at that point. Except weep.
But God had other ideas.
The man in the minivan behind me saw me pushing my car and told me to get back in and steer - he would push me to the finish. With his pushing and my steering, we made it to the recycling center. There, I dumped my old, dirty coolant and wondered how I would get back without anything in my radiator.
The answer? Very slowly, and in spurts. I stopped at a fast food place and cooled down. I stopped at a bike shop and cooled down. I stopped at an auto body shop and cooled down. I even stopped in the middle of the road and cooled down. But finally, after what should have been an hour-long errand stretched into a 4 hour long odyssey, I had finally gotten back to my parents' garage, and I got to work.
My thought was that my thermostat failed - fortunately, I had been prepared and ordered that beforehand, as well as a thermostat gasket. While letting Misty cool down, I tested the new thermostat I got. The way a thermostat works is that it will stay closed when the engine is below operating temperature and keep the coolant in the engine, but when the engine heats up enough, it will open, which causes the coolant to flow into the radiator to get cooled down. The new thermostat opened up when submerged in a pot of boiling water, as I expected. So knowing that my parts weren't defective, I got to work.
First, I drained what little coolant was left in the system. You know the drill by now - find the draincock on the passenger's side of the radiator, twist it with pliers and watch the coolant dribble.
Next, I found the thermostat. This is the one thing I will give the Mopar engineers credit for - they made the thermostat extremely easy to find. It's literally right in front of the intake plenum, with a big hose attached to the housing. You can't miss it, even if you were blind. Thank you, Lee Iaccoca, for that - I helped A-Dawg replace her thermostat last winter on her VW Beetle and she had to have me and another friend of hers, Pythias, hold some gears open while she stuck her arm in the engine bay and stuck the thermostat in. That's what I like about American cars - German cars are unforgiving, because these smartly built cars require smartly built mechanics to repair them. American engineers know we're stupid, so they build them stupidly, but make them easy enough for stupid people like me to fix them.
Speaking of stupid, this repair was stupid simple. I just took off the hose with my pliers, the two bolts that held the thermostat housing down with my 13mm socket and wrench, and took the housing off. The housing came off, and with it the gasket - in two pieces, anyway.
The old thermostat itself was absolutely rusty - it was completely brown. However, I still had the pot of water boiling, so I decided to test it out. And - it opened up in boiling water too! So, it wasn't the thermostat that was my issue. I probably should have replaced it anyway, since it was super rusty though.
So, seeing that the thermostat didn't have any issues, I went and installed the new thermostat anyway, put a new gasket on the housing (after wetting the gasket with some coolant first!) and investigated further.
The search was extremely quick. My radiator cap (which is on the overfill bottle because the radiator on the Dodge Intrepid fills from there), which is supposed to keep the coolant system sealed and keep the coolant under pressure so it doesn't boil and steam off, had a chunk missing from the rubber seal. No wonder my coolant was boiling and steaming off.
Unfortunately, I wasn't prepared to replace the radiator cap off, so I had to go to the parts store and buy a $10 radiator cap when I could have ordered it for way cheaper. That's what I get for not being prepared.
So, after that dead simple repair, I refilled the coolant and bled the system of air by opening the bleed valve on the thermostat housing and putting a 1/4" hose on it. Then, I decided to test the coolant system by simulating a lot of idling like I did at the recycling center. I drove over to the nearest Burger King, waited in a drive through, and got myself a vegan burger meal.
Misty performed admirably! Although, I could definitely feel some weirdness in her brakes - she was pulsing like crazy when I braked. After I went home, I put new brake rotors on her front wheels - not too hard of a job, doesn't require any different tools from my front brake job I did a week ago - and drove around again - and there was still a pulsing. Huh.
So, I tested the wheels again to see what was going on. I shook the passenger's side wheel up and down - nothing. I shook the passenger's side wheel left and right- nothing. Driver's side, up and down - nothing. Driver's side, left and right - a lot. Uh Oh.
I took off the wheel and shook each part of the suspension to see what was going on. And what do you know - I found the last thing I needed to repair to make Misty perfect. Loose inner tie rods. But I couldn't get her fixed in time - not before I needed to pick up my parents from the airport. So for now, that will have to wait - it's not really going to be dangerous, since the way the tie rods are attached to the wheel, it's not possible for it to be disengaged there in the early stages of it going bad. I could get to Cincinnati to pick up Mama and Baba. I'm sure of it!

NEXT TIME ON ↝GARAGE ✯ MYSTIQUE↜:
We will see the harvest of the seeds we sowed all month long. Misty gets her first true test since her valve cover gasket replacements - see you in Cincy!

SATURDAY 5/23/2026

Previously on ↝GARAGE ✯ MYSTIQUE↜...

We won't tolerate rat shit in the brake lines. I'll flush those brake lines out and make Misty brake cleanly and neatly!
    TOOLS USED:
  • Safety Glasses and Gloves
  • Scissor Jack
  • 2 Ton Jack Stands
  • 19mm Socket and Breaker Bar
  • 5/16ths Inch Wrench
  • 3/16ths Inch Inner Diameter Hose
  • 3/8ths Inch Wrench
  • 1/4ths Inch Inner Diameter Hose
  • Plastic Bottle with a hole in the cap
  • Milk Crate
  • Rags
  • Condiment Bottle
  • Needle Nose Locking Pliers
  • Groove Joint Pliers
    PARTS NEEDED:
  • 32oz of Brake Fluid

Jack Up? ✔

After recovering from the mild chemical burns I sustained from bleeding the back drum brake cylinders, I was ready to get the brakes bled for real! But first, I had to reconnect the parking brake.
The main problem with the parking brake was that the spring around the cable was super stiff, so no matter what I did, the spring wouldn't budge. I tried so many things - I even brought out my mini blowtorch! What ended up working was this: I grabbed onto the end of the cable with some groove joint pliers, then grabbed the spring with my needle nose locking pliers. Once both were secured, I wedged them against each other and then but them in my right hand. With my left, I slid the lever onto the naked cable. Just in case I made this sound easy, this took about 20 tries.
So after putting the parking brake on and reassembling the drums, it was time to bleed the brakes. The weird thing about this is, the back brakes and front brakes take two different sizes of wrench. The back will open with a 5/16ths inch wrench, and the front will open with a 3/8ths. Also, the back will fit a 3/16ths inch hose, while the back will fit a 1/4th inch hose. Thanks, Lee Iacocca (said the plastic hose industry)!
First, what I did was take some brake fluid out of the master cylinder. Actually, first I drank a whole bottle of bubblegum flavored pop. I probably didn't need to - it was that nasty cheap Faygo that probably has used brake fluid as one of its ingredients, and I would need to put some brake fluid in the bottle anyway so that if anything gets sucked back in the brake lines, it's just brake fluid.
I drilled a hole that would fit my hoses, and punched another, much smaller hole so that air could escape the bottle. Then, I popped open my hood, found the master cylinder near the driver's side firewall, opened it and emptied it to half with my condiment bottle. After transferring the old dirty brake fluid into my bottle, I topped off the master cylinder with clean brake fluid and got started with the back brakes.
PRO TIP: ALWAYS get the 32oz bottle. You will need all 32 ounces and not a drop more! I cheaped out and got 2 12oz bottles, and I didn't have enough fluid to fill the cylinder all the way. That made my brake light come on, which made me watch the brake light instead of the back windshield when I was backing out Mystique from my parents' garage, which made me back Mystique right into the back of my parents' SUV. Oops. So, always get the 32oz bottle or you will put dents in your parents' car. And so you can save some money, because brake fluid can't be stored on the shelf once opened.
Anyway, I bled the passenger's side back brakes first. I broke all the wheel lug nuts, jacked the car up onto FOUR jack stands this time, and took all the wheels off. After that, I just had tostand back and marvel at that sight - my Mystique, flying in the air. I bet when Mystique was being manufactured back in 1996 people thought that we would have flying cars in 30 years. I guess this is as close as we're going to get.
After putting my 3/16ths Inner Diameter hose into my bottle so that one end was submerged in bubblegum Faygo brake fluid, I attached the other end of the hose to the bleed valve that's behind the drum and below the brake line, and cracked it open (very carefully, since the nut was extremely rusty and could strip really easily). Immediately, nasty old brake fluid came out of the valve and travelled a tiny bit up the hose, and a little bit leaked onto my hands. Luckily, I had a rag with me.
I went to the cockpit of my car and pressed the brakes, and got... nothing. When I went back to check on the progress of the flush, there was a tiny bit of brake fluid that was ebbing away from the hose, and I was starting to get air into the system. So, I thought I had to disconnect the brake booster vacuum hose for some reason - probably because when you have the brake booster hose off, the brake will be able to pump to the bottom every time when the car is off, since pressure can be relieved there.
That was not the right move, and that did absolutely nothing. So lesson learned - don't tkae the brake booster hose off. Instead, what I did was crack the valve open more, and put the bottle on a milk crate so that the hose is above the brake lines. That way, any air that gets introduced settles in the highest point of the system - that being the hose.
So, after a few pumps of the brakes, the master cylinder level was lowered and the old, nasty fluid was being pumped out. I put more brake fluid in the cylinder and kept pumping until the fluid in the hose line was an almost-clear amber color as it should be. After that, I closed up that valve and moved onto the driver's side back brakes, where I did the same thing.
After bleeding the back brakes, I moved up to the passenger's side front brake. The valve up there uses a 3/8ths inch wrench to crack open, and takes a 1/4 inch inner diameter hose, and is located on the caliper, right next to the brake line. I cracked it open, put my hose there, and kept pumping the brakes and topping off the master cylinder as needed. Same thing with the driver's side.
Finally, after flushing the entire system, I closed the master cylinder and cleaned the outside of it. I didn't end up filling it to the max fill ine because I didn't have enough fluid, so the brake light on my dash lit up. I backed my car out to grab more from the store and... well, you know. But once I got more brake fluid, the brake light disappeared, and now everything was perfect with my brakes!
Well, kind of. I was still getting a weird pulsing and a light screeching in the front brakes, so I resolved to change my rotors, since they were probably warped. But that (and the dent in my mom's car!!) will be a repair for a different day. For now, I was satisfied with how well Misty braked, and I knew she could keep me safe and sound... or so I thought.

NEXT TIME ON ↝GARAGE ✯ MYSTIQUE↜:
Misty just can't seem to keep a cool head! We'll fix that with a new thermostat and radiator cap.

WEDNESDAY 5/20/2026

Previously on ↝GARAGE ✯ MYSTIQUE↜...

Misty demands satisfaction! Her back brakes will be renewed, and her brake lines will be refreshed with new brake fluid.
    TOOLS USED:
  • Safety Glasses and Gloves
  • Scissor Jack
  • 2 Ton Jack Stands
  • 19mm Socket and Breaker Bar
  • Flathead Screwdriver
  • Hammer
  • Needle Nose Pliers
  • Straight Pick
  • Hook Pick
  • Needle Nose Locking Pliers
  • Groove Joint Pliers
  • Brake Cleaner
  • Metal Wire Brush
  • Anti-Seize Grease (Permatex 80078 or equivalent)
    PARTS NEEDED:
  • 2 pairs of Brake Shoes
  • 2 Drums
  • 1 Set of Drum Brake Springs
  • 2 pairs of Self-Adjuster Assemblies (feel free to reuse these if you can get them off!)

Jack Up? ✔

PART 2

So, the wheel cylinder was a total bust. I'm guessing it requires a 9mm wrench, because my 10mm wrench was too big and my 5/16ths wrench was too small. Fortunately, I found out that the brake fluid bleed valve takes 5/16ths exactly. That will make bleeding the brakes a piece of cake!
But onward! Onward! I still need to put that drum on the driver's side brake. So I tried that - and it was an extremely tight fit. It was definitely not normal. But I was already 8 hours into this 1 hour brake job, so I just shrugged and went to the other brake.
This time, it took 1 hour to assemble and dissasemble the brake! Slight problem, though - first, the parking brake lever would NOT fit on the cable. Second, the drum would NOT fit on the assembly. That was when I realized that I needed to push the wheel cylinder in. It wouldn't move if I just pinched it, so, me being stupid (or maybe just thinking ahead), I opened the bleeder valve with my 5/16ths wrench and pushed the cylinder, and that made the brake fluid leach out. It smelled, weirdly enough, like that old dirty coolant I was running in my car. Maybe that nasty vanilla smell is the smell of rat droppings or something.
After I bled the brakes, the drum actually fit! I couldn't get the parking brake though, no matter how many hours (maybe 5? 6? Time tends to run together in the early morning hours) I spent trying to get it in. I definitely needed vise grips for this.
I bled the brakes on the other side, and put the drum on. And finally, after hours and hours of working (and a 2 hour midnight snack of Chinese radish soup and Japanese tofu curry), I was... kinda done with this job. I still needed to repalce the parking brake cable and I still needed to bleed the brakes, but after putting a new cotter pin on the driver's side wheel hub and bedding the brakes, Misty drove smooth-ish. I think I'll need to replace her rotors too - they might not be as good as I thought they were - but that's OK. Now that I know how to do these jobs, they definitely won't take 20 hours.

PART 1

20 Hours. 20 hours I spent on those damn drum brakes. This is what I get for feeling the things I shouldn't feel about her anymore.
The only thing that went smoothly was putting on my safety glasses. After that, things immediately went wrong - before jacking up the car in the back and taking off the hubcaps with my flathead screwdriver, I went to break the lug nuts. I didn't see that the 12 point 19mm socket that I had on my breaker bar wasn't seated all the way - so I pulled up hard as I could, and stripped the hell out of one of the lug nuts.
Fortunately, there was just enough of the sides left to use my emergency tire iron with 6 sides to unscrew it. I already had to use a lug nut extractor to remove my neighbor's completely stripped lug nut, and that took an impact wrench I borrowed from him to handle it - something I definitely can't afford to add to my aresnal right now.
After that, this seemed like an easy enough fix - I started on the driver's side brake first, and wiggled the old drum off. This was the culprit for all of the squeaking and squealing that I was having with my brakes, and no wonder - when I took it off (with a few taps of the hammer), the inside of the drum was worn to shreds. I could literally feel grooves up and down the inside of the drum. The shoes were thin as well, so I decided to replace everything, even the wheel cylinders. Or, I thought I could. I just had to take off the shoes first.
The way the drum brakes on the Dodge Intrepid are arranged is actually pretty simple compared to the drum brakes on other cars from the tutorials I watched (it's almost impossible to find videos on how to do 1st gen Dodge Intrepid... well, anything, really, but pertinently drum brakes. This is the only video I could find on that topic), because there's only one long spring on top, two small springs that hook up to fairly obvious holes on the bottom, a parking brake cable that links to the lever on the brake shoe closest to the back of the car, and a spring with a long hook that hooks onto the self-adjuster from the last remaining hole on the bottom in the parking brake shoe. The self-adjuster has a thick fork and a thin fork - that one gets tricky to keep track of, but the thick fork is where the self-adjuster fits into, then the star wheel that actually adjusts the shoes' width is in the middle and threads onto the thin fork. Each shoe is then held on by a spring and pin mechanism in the middle.
That was pretty obvious to see. To remove them was a whole different story. First of all, I had the wrong tools for the job. The needle nose pliers I had required me to grip those springs super hard in order to even try to budge them. The openings where the springs sat were also extremely small, so I wouldn't be able to use the screwdriver to wedge them out like I thought. The self-adjuster spring was kind of easy, since I could grab onto the long hook and pull. After hours and hours of trying and failing, I finally got the lower springs out by pulling them out with the needle nose pliers. Then, I took off the hold-down springs by pressing my index finger against the pin's backing, then grabbing onto the spring with my groove joint pliers and pushing into it with the assistance of the thumb of the hand that was holding the pin down and twisting 90 degrees so that the spring would pop off of the pin. Make sure you have a firm grip - otherwise, you will get a spring straight to the chest. Luckily, it didn't hurt, and even more luckily, it didn't go for my eye, and even even more luckily, I was wearing my safety goggles.
Finally, I had to get rid of the top spring - or did I? After trying again and again and again to get the top spring off, I looked at the Chilton manual and saw that I could remove the whole shoe, top spring and self-adjuster assembly - by removing the wheel hub.
Do not do what I'm about to do unless you want to have another dumbass thing to buy. What I did was remove the dust cap off of the wheel hub first by taking a screwdriver, wedging it between the dust cap and wheel hub, and hammering it to separate them. Then, once I got the dust cap off, I took out the cotter pin. Then, I realized too late that not only do I NOT have a socket big enough to take off the wheel bearing, I also DON'T have a torque wrench with a high enough range to let me actually get that thing done. So, I would need to replace the stupid freaking cotter pin.
In my rage, I took the shoe assembly and shook it like a maniac, hoping to just brute-force it off. This actually worked! There was just enough space to take the shoe assembly off by wiggling it off of the wheel hub. The parking brake cable was still connected to it, so I just turned the shoe assembly upside down and slipped it off. So, that whole 1 hour ordeal with the wheel hub was completely pointless, and now I needed to buy a new cotter pin.
Whatever. Now it was time to put a new shoe assembly back together. Problem is, you need to put the shoe back on the parking brake first before you can even think of putting the shoes on - there's just not enough space with the wheel hub there. That was kind of easy for the driver's side because the spring around the cable was kind of broken in a circumcised way, so I could slide it up super easy and put the parking brake on.
Before I had to metaphorically pull teeth to get this done, I cleaned the backing plate with my brake cleaner and a metal wire brush, and the greased down the contact points - those are the parts that the shoes slide on when you're braking. You also need to grease down the hinge between the shoe and self-adjuster lever too - the manual won't tell you that, but I will.
Now, to get the springs in. After 3 hours of trying and failing to put the new springs onto the new shoes with pliers, I figured out that the holes were small - but not too small for a pick to slide in. So, after assembling the self-adjuster, I used a straight pick to slide the long top spring into its holes, and then put that assembly on the backing plate. Then came the self-adjuster spring. Then the two little springs on the bottom. And that was the entirely wrong order of events, because I didn't even push the wheel cylinder back. Why?
Because I had given up on that when I stripped the bolt that held it onto the backing plate.
TO BE CONTINUED

NEXT TIME ON ↝GARAGE ✯ MYSTIQUE↜:
We won't tolerate rat shit in the brake lines. I'll flush those brake lines out and make Misty brake cleanly and neatly!

WEDNESDAY 5/13/2026

Previously on ↝GARAGE ✯ MYSTIQUE↜...

Misty can go - but can she stop? The brakes will finally be addressed!
    TOOLS USED:
  • Scissor Jack
  • 2 Ton Jack Stands
  • 19mm Socket and Breaker Bar
  • 10mm Socket and Wrench
  • Screwdriver
  • Hammer
  • 4" C-Clamp
  • Brake Cleaner
  • Silicone Grease/Dielectric Grease
  • Anti-Sieze Grease (Permatex 80078 or equivalent)
  • Torque Wrench
    PARTS NEEDED:
  • 2 pairs of Brake Pads

Jack Up? ✔

The night before was wasted on dreams of my ex. Of how she used to stroke my hand when we drove in her car. Of how she used to touch me gently, because she knew I was ticklish. Of how she used to hold me. Kiss me. Bite me. Grab me. F-
STOP! ! !
Like water evaporating from a hot brake line, so too did this dream, catapulting me straight through the windshield that separated the vehicle of pining and the asphalt of reality. I woke up covered in fingernail lacerations I left on my arms from hugging a pillow innaporpriately at night, and in that tipping point between madness and morning, in that split second where the windshield shatters in a million pieces and everything that is possible in the driver's seat of the dream is carved away to prepare my carcass on the the highways of sunlight striking through the blinds, the only real thought that occured to me was this:
It was time to replace my brakes.
They are embarassing to ride on. Any time I stopped, they screeched like banshees. The pedal was spongy too, which meant I would need to bleed and re-fill the brake fluid. And every time I stopped, I had to brake miles before where I wanted to stop, otherwise I'd just keep rolling past. The engine that I chipped away at was bulletproof now, but that means nothing if I can't stop it whenever I like.
The first thing I did was jack the front of the car up. The rocker panels that let me jack up the car were quickly deteriorating, but still had a few more repairs before they were done for and I needed to get a real jack. Then, I realized that I'm a dumbass and that I needed to actually set the car down and break the lug nuts before I could actually access the brakes. So, using my 19mm socket and torque bar, I broke the lug nuts, then jacked the car up, and got to work.
Mystique has disc brakes in the front and drum brakes in the rear, just like most 90s econobox cars. She could have had a full set of disc brakes - that would have certainly made my life easier - but that would require her to be an ES model, which would require her first owner to not be cheap but unfortunately, she's extremely poverty spec. No ABS, no temperature control, no built-in compass, and certainly no full disc brake set. But that's OK - she still makes me happy. And that's all I can ask of her.
Once the wheel was off, I got to work unbolting the caliper guide pins, which were 10mm bolts. Once you do that, you should be able to remove the caliper from the rotor with a screwdriver. But the past long eroded into residue makes things cling longer than they should - in this case, the brake dust and rust pretty much welded the caliper to the rotor. I had to tap the caliper off with a hammer to get it loose.
The rotor underneath actually looked alright! So, I kept it. Now that the brake caliper was off, I could remove the brake pads, which isn't actually super hard. The outer pad needs to be pried up with a screwdriver on the tabs so that it can slide off the caliper, and the inner brake pad slides right out of the piston. The next thing to do was to put the new brake pads in. I put the new inner brake pad in first (making sure to grease the back and sides of it where it meets the caliper with anti-seize) and then used the C-Clamp to push in the piston and reset the brakes. Then, I snapped the outer brake pad in (again, greasing with the anti-seize on the back and sides), and then put the caliper onto the rotor.
The hard part was putting the caliper pins back in. No matter how much I tried, the pins would not go back in - the outer hole was easy because it didn't have any threads, but the inner hole kept getting misaligned, so I couldn't stick it all the way in. In and out and in and out I tried. And in and out. And in and out... And...
It's so hard to be loved when you're not relaxed. That was the lesson I had learned that brought me success with this brake job. So, I took a quick break to smoke some weed, and then got back to work. This time, I seated the caliper more securely, so that it fit into the little tabs built into the caliper mount. Then, I could finally stick the pins in. I lathered the pins in silicone based grease, and then carefully, easily, sensitively, I slid that bolt right in deep.
Now I know how she felt - to be patient with the things you love. I torqued down the bolts to about 21 foot-pounds, and then put the wheel back on. Then, it was on to the other brake, which was the same story. Finally, after putting the wheels back on and not really torqueing to spec because I didn't have a torque wrench that goes up to 100 foot pounds (I just torqued down the wheels until I couldn't twist any more), I went for a drive.
And... I could stop, same as before. The brakes still squealed, but only from the back this time - she got the attention she needed. All she needed now was satisfaction. But now, I can stop with just a bit more confidence. What a difference a tender hand makes!
Now if you'll excuse me... I might have a call to make.

NEXT TIME ON ↝GARAGE ✯ MYSTIQUE↜:
Misty demands satisfaction! Her back brakes will be renewed, and her brake lines will be refreshed with new brake fluid.

TUESDAY 5/12/2026

Previously on ↝GARAGE ✯ MYSTIQUE↜...

A proper coolant flush is in order! Get your rest, Misty - a nourishing green rain will wash over the barren wastes of your coolant overflow tank, and your thirst will be sated again!
    TOOLS USED:
  • Scissor Jack
  • 2 Ton Jack Stands
  • Pliers
  • SAE 3/8" Wrench
  • Funnel
  • 1/4" Hose (preferably clear!)
  • Empty water jug
  • Rags
    PARTS NEEDED:
  • 2 Gallons of concentrated coolant (Zerex ZX001 or equivalent)
  • 3 Gallons of distilled water

Jack Up? ✔

I'm quickly learning that Misty is a bit of a snob. If I want to do anything with her, I need to do it right, and that includes a coolant flush. Misty was completely dry, so I put in a gallon and a half of distilled water into the coolant system and tried my best to burp out any air bubbles with just the funnel - which is always messy, especially if you don't have a fancy no-spill funnel. I just had some common kitchen funnels from the big-box store that worked well enough - I just had to make sure not to let it boil over or I'd still have major problems.
Afterwards, I had to go to the hardware store to grab a set of metric wrenches. I took Misty so that the water could mix with whatever might be left in the engine, and after letting Misty cool down for a bit, I was ready to really get started.
First, I put Misty up on jack stands. This is so that when I drained the coolant from the draincock, every bit of coolant would come out. Then, I opened up the draincock (which is in the lower passenger's side of the radiator) by twisting on it counterclockwise until it started peeing dirty brown water - at least it wasn't black like when I started, but I was going to do two coolant flushes anyway. so I wasn't worried.
Now, the manual says that you're supposed to drain the engine by finding the drain holes in the exhaust manifolds. Unfortunately, they didn't give me any pictures as to where the exhaust manifolds were, so what I would do is two coolant flushes. My reasoning is that, assuming the system was filled with 100% water and the system held a total of 3 gallons of liquid like the owner's manual said, if I added the one and a half gallons (or half of the total volume of the system) of 50/50 coolant, then I would have 75 water and 25 coolant after letting the engine run and mix up with the radiator's 50/50. Then, if I drained the radiator again and refilled with 50/50 coolant, I would have 62.5 water and 37.5 coolant. After draining and refilling one gallon, I'd have 7/12 water and 5/12 coolant, which I will deem close enough - I'd need to refill coolant every once in a while anyway, and I plan on re-flushing the coolant in the fall before the winter weather comes.
So, with all that math out of the way, I got to work. First thing I did was loosen the bleeder valve on the upper radiator hose on the lower intake manifold - it sticks out right on the front of the car. This requires a 3/8" wrench to open (which is the same as the brake fluid bleeder valves...foreshadowing...), and once I did that I stuck a 1/4" clear fuel line hose on the top of the valve, and snaked it into one of my many empty gallon jugs.
Then, after re-tightening the draincock, I filled the radiator tank on the passenger's side of the car with coolant by opening the radiator cap, putting the funnel in the opening and pouring the coolant in. I only ended up pouring about a gallon of coolant in the tank and I knew I could put more in, so I started the engine and let the coolant flow through. The bleeder valve made all the difference - now I could actually see air coming out of the system. I routed the hose so part of it was higher than the highest point of the coolant system so that air wouldn't travel back up the hose, and I let the air bleed out.
After about 10 minutes, the coolant system drained out all of the air, and it was starting to get hot, so I turned off the engineclosed the system by closing the bleeder valve first and then putting the radiator cap back on. Then I went for a quick drive to let the coolant mix in the system.
After I came back from my drive and let the car cool down, I just repeated the process above two more times. On the second time, the coolant/water mix I took out was pretty green, so I just took it out and filtered it through a rag to use as 75 water/25 coolant mix. With the way the automotive industry price gouges (and apparently motor oil is next!!) I might as well save and recycle as much as I can.
Now that I have 7/12 water and 5/12 coolant, I took Misty out for a test drive and... she didn't overheat! Now, she is running a bit hot (in stop and go traffic, she gets to about the middle), but I think that's because one of the plugs on the engine fan isn't plugged in and I can't find where it's supposed to plug in. Whoever can tell me where it is will be getting a big kiss.

NEXT TIME ON ↝GARAGE ✯ MYSTIQUE↜:
Misty can go - but can she stop? The brakes will finally be addressed!

SUNDAY 5/10/2026

Previously on ↝GARAGE ✯ MYSTIQUE↜...

The sins of the mother may yet be forgiven! Tune in for Misty's next tune-up as I replace her fuel injector O-Rings!
    TOOLS USED:
  • 8mm, 10mm, 13mm and 15mm socket & ratchet wrench
  • Torque Wrench with 3/8 inch drive with 5-100 ft-lb range
  • 3 inch extension
  • Groove joint pliers
  • PB Blaster or equivalent penetrating oil
  • Rags
    PARTS NEEDED:
  • Fuel Injector O-Rings
  • 1 foot of 1/8" vacuum line (for the Manifold Tuning Valve)

Jack Up? ✖

Gas leak? In this economy? Yeah, we're not doing that.
So, it was time to put Misty under again. This time, I didn't drain the coolant because 1: I wasn't taking the lower plenum off and 2: there was barely any coolant left in the system anyway since I boiled it off by driving without the cap on. There goes $15 of coolant into thin air - literally.
So after relieving the fuel pressure by taking off the fuel pump relay and cranking the engine for a few seconds (VERY IMPORTANT!!! We're messing with the fuel rail after all so don't skip this step!) and then disconnecting the battery, I took off the plenum. I've done this a million times before; take off all of the hoses, take off the throttle cables, disconnect the EGR line, loosen the mounting bolts yeah yeah yeah you've heard it all before. After I took the plenum off (a new record! 30 minutes to take it off this time!) it was time to take the fuel rail off.
So, the reason one of my fuel injectors was leaking gas was because one of the O-Rings failed, and gas leaked through that seal.I did this once before, to put in new fuel rail gaskets (which thankfully were still intact), so this a piece of cake. I took out all of the fuel injector plugs first. Then, I put a rag (a ratty band T-Shirt of "Big Fat Head" from Columbus, Ohio) underneath where the fuel rail joins in two places with the fuel line behind the intake plenum (if looking at the engine from the front of the car). The fuel line already comes with quick-disconnect fittings, so no need for a fuel line disconnector - just push the fuel line into the plastic quick-disconnect fitting until it's fully in, and then take both off of the fuel rail. IT WILL DRIP!! So keep that rag ready.
Once you remove the fuel rail connections, you need to remove the fuel rails themselves. Those are connected to the lower intake manifold by 6 10mm bolts, so take those off, as well as the upper radiator hose and the heater block hose, and the fuel rails will be free. Once I took the fuel rail off of the engine, I had to remove the retaining clips on the fuel rail. Those were held on with one 8mm bolt on each side, which I removed with a socket. Then, I had to shift each clip to the side so that they weren't keeping the fuel injectors secured. If the fuel rail retainer is rusty like mine was, you may need to use a hammer to tap lightly on it so that you can shift it to the side.
Now for the fun part: actually removing the fuel injectors. The manual says that I should take a screwdriver and pry them out of the fuel rail, which to me is a red flag. Why are you asking me to pry out a piece that's literally made out of plastic?
There was no room to put a flathead screwdriver there either, so instead what I did was this: I took a pair of groove-joint pliers and pulled on them like carrots, bracing it with my feet. There was a notch on the fuel injectors that let me twist them and let them rest without having me lose all of my progress, but it still took a lot of strength, and more than once the pliers slipped off and scratched the plastic material.
Once I got the fuel injectors out, I saw that the fuel injector O-Rings (ALL of them) were in rough, rough shape - one of them (the one leaking gas) was already broken, and the other ones were so disintegrated that they were ready to go next. I took the old O-Rings off (there are two O-Rings on each fuel injector - one big that goes right underneath the plug, and one small that goes on the tip of fuel injector) and lubricated new ones with motor oil and put them on.
There are tiny little holes on the fuel injectors where the fuel injects through, so if you put the injectors in wrong, you won't get any gas flowing through. This is the one smart thing the Mopar engineers did - the notch that they made for the fuel injectors are such that you can't put them in the wrong way. I pressed the fuel injectors in - they don't really make a "click" or have any feedback to let you know that you put them all the way in, so I just jammed them in there by bracing the fuel injector upside down on a concrete ledge, then putting the fuel rail slot over it and pushing it down until the tip of it came out of the side of the fuel rail facing me.
Now all that was left to do was reassemble everything. I put the fuel rail retaining clips back on and tightened the 8mm bolts to finger-tight, then put the fuel rail in and tightened those to 8 foot pounds (and listened closely to that cheap-o torque wrench to make sure I didn't break any more bolts!!). Once I did that, I started to put the intake plenum back on and noticed that the Manifold Tuning Valve hose was completely hard and split down the middle. So, I went to the parts store, got a foot of new hose and replaced it - I did not want ANYTHING to do with any new vacuum leaks. Then, I put the plenum back on and tightened the bolts up, put the fuel pump relay back in the car, and then started the engine.
It worked! And now, there was no gas coming out of the car. I felt great - so I took Mystique out for a little spin, to my friend DD's apartment to pick her up and look at cars to buy.
The test drive went smoothly enough, but the temperature gauge kept climbing higher and higher. And even worse, white steam started coming out of the radiator, even though I had put the cap back on. I drove all the way to DD's apartment and then had to immediately stop, because the temperature gauge went to red. I tried turning the engine over again, but Mystique refused to let me beat on her further. So, DD and I went car shopping in her dumbass SUV she hates and we saw a very decent '99 Honda Civic that I thought she should get. Then, after working a shift at the boredom factory (my bullshit job as a receptionist), I went back to Misty, and braved the highway to get back home. I had to stop only once, but once I got back home I let her cool off, and then tried to drain her coolant.
She was bone dry.

NEXT TIME ON ↝GARAGE ✯ MYSTIQUE↜:
A proper coolant flush is in order! Get your rest, Misty - a nourishing green rain will wash over the barren wastes of your coolant overflow tank, and your thirst will be sated again!

SATURDAY 5/9/2026

Previously on ↝GARAGE ✯ MYSTIQUE↜...

Two words. Broken Bolt. Expect an update soon.
    TOOLS USED:
  • Scissor jack and 1 jack stand
  • 8mm, 10mm, 13mm and 15mm socket & ratchet wrench
  • Drain Pan
  • Torque Wrench with 3/8 inch drive with 5-100 ft-lb range
  • 3 inch extension
  • PB Blaster or equivalent penetrating oil
  • Rags
  • Scouring Pad
  • Drain Pan
  • Soapy Water (1 part dish soap to 9 parts water)
  • Center Punch
  • Hammer
  • Screw Extractors (I messed up and did the procedure wrong, but you can use it if you do it right)
  • Power Drill
  • Small drill bits (5/64ths)
  • Groove joint pliers
  • Funnel
    PARTS NEEDED:
  • M6 x 1 inch bolts
  • Zerex Green Coolant
  • Distilled Water

Jack Up? ✔

PART 2


White smoke coming out the engine.
I knew from the videos that I watched about car maintenance that it had something to do with coolant - mostly, coolant mixing with things it should never be mixed with, like oil.
So, I stopped the engine (thank goodness I could still start the engine! Looks like the oil leak was sealed) and decided to drain the system and fill it again - this time with more distilled water. Maybe then no more white smoke will come out.

    Top ten things to do while you wait for your coolant sytem air to burp out.
  1. Freak out
  2. Text your friend A-Dawg
  3. Tell her you're sorry for moving out
  4. Tell her how much you feel like a failure
  5. Tell her that you miss her and should have learned more about cars from her
  6. Smoke some weed
  7. Eat some Chinese food
  8. Make peace with the fact that your car is a complete lemon and you wasted nearly 1000 dollars on parts and tools on a 2000 car just so that you could save some money and play mechanic like an idiot instead of getting it done professionally.
  9. Realize the "white smoke" coming out the engine was actually steam from the water dripping out of the radiator overfill hose, and that there is no coolant leak
  10. Clean your car out while the air is burping

Once I filled the system to 2 gallons of water (which was 1 gallon less than I needed), the water actually boiled over and I got scared and turned off the engine. Then, after waiting for a bit, I drained the coolant system while the system was still hot so that the water could come out of the heater core and through the thermostat, and then sealed the petcock again and filled it again.
I did this one more time before I refilled with coolant and went for a drive and she didn't complain. So, I brought her back to my parents' garage and got some sleep, because I needed to work the next morning. Little did I know, I forgot to put the radiator cap back on.
The next day, I drove out to work, and as soon as I got out of my car I noticed the huge green puddle on the ground flowing out of the car. A coolant leak. Wonderful. And on top of that, I smelled a lot of gas too - so either I'll kill this car by overheating her, or she'll kill me by blowing me up.
Sorry, Misty, but I've put too much love into you to let this happen. Either we both make it out alive, or we meet our demise together.
I checked under the hood and noticed a lot of gas piling up on a fuel injector. I tested to see if the fuel injectors worked by taking a screwdriver and putting it up to my ear. I heard clicking on all of the fuel injectors, so they were working as intended. That tells me that the fuel injectors were leaking, which meant the O-Rings were bad. So, that night, I would have to do another repair on Misty - a fuel injector O-Ring replacement, and finish the coolant flush.

NEXT TIME ON ↝GARAGE ✯ MYSTIQUE↜:
The sins of the mother may yet be forgiven! Tune in for Misty's next tune-up as I replace her fuel injector O-Rings!

PART 1

There's a poem I like from Phyllis McGinley. It goes something like this:

The Adversary
A mother's hardest to forgive.
Life is the fruit she longs to hand you,
ripe on a plate. And while you live,
relentlessly, she understands you.

I'm reminded of this poem as I write this blog post on Mother's Day, when my own mother is far, far away as she and my dad are in China visiting family. I have been pressed into looking after her dog and her house while she's gone, which means I get to use her garage to do all sorts of repairs to Misty. Just the right timing, too - I really don't think this could have been done without her garage, or her power drill that I borrowed.
But about the broken bolt. It started when I was helping my neighbor fix his sway bar mounts. The bolts just weren't budging with a normal wrench, and my torque bar was 1/2" drive only, so I had to resort to using my torque wrench to break the threads. Big mistake - now my old torque wrench was locked. Well, it's not like it's a huge deal - it was a $15 garage sale find, but it was a good quality wrench. I will need to repair her later, but at that time, I had an oil leak coming from somewhere, so I had to get something else quick. That something else quick was a cheap-o torque wrench from Menard's.
So, torque wrench in hand and hubris in my heart, I started tightening the valve cover bolts. I misremembered the torque spec on the valve covers and went for 21 ft-lbs (I got them confused for the intake manifold torque specs - the valve cover torque should be about 9 ft-lbs). I tightened... and tightened... and tightened... and I heard the most dinky, bashful "click" come from the torque wrench. But it didn't feel anything like my confident, loud, old wrench - so I kept tightening. And tightening... and POP!
And by that time, it was too late - the head of one of my valve cover bolts had snapped off, and the rest of it was imbedded in the thread. So, that means I would need to get it out somehow, otherwise I would be driving with a permanent valve cover gasket leak.
This time, I jacked the car up and drained the coolant (which was full of distilled water and coolant cleaner) and then relieved the fuel pressure and disconnected the battery. I felt like a surgeon putting a patient under anesthesia. Maybe my mom would be proud to see this - she always did want me to be a doctor.
Then, it was the same old story of taking the intake plenum off. Too easy - I could probably do it in my sleep at this point. Then, I had to take off the passenger side valve cover because the broken bolt was in there. But to do that, I had to loosen the AC compressor mount from the engine. This time, I learned from my mistakes - I only took off the front bolt and loosened the lower bolt nearest to the firewall, and that was enough to let it hang away from the engine without damaging the belt. Then, I took the passenger side plenum mount off by first unplugging the ignition coil that was bolted on it, then unbolting that with a 10mm socket (it has two bolts), and then taking the mount off with a 15mm socket (again, two bolts).
Then, it was time to take that bolt out.
What I thought I'd do was take out the bolt by hitting it with PB Blaster first, then punching the bolt in the center with a center punch and drilling a hole with a small drill (these valve cover bolts are really small! They're only M6 in diameter) in the punched hole. The bolt was all the way recessed and made of 10.9 grade steel, but hey, it's a tiny little bolt. How bad could it be?
Well, first I punched a hole and because the bolt was super rough where it broke, I ended up punching it to the side. Then I started drilling a hole and ended up drilling a tiny, shallow hole way off center. Then I broke the drill bit I was using. Then another one. And then I lost another drill bit somewhere in my engine bay. So I found myself 5 hours into this job and going nowhere fast - there was no way I was going to be able to get rid of this bolt with the bolt extractors. I'd have to do something different.
In my frustration, I tried punching another hole, but my aim slipped and I hit to the side of the hole I already made - and it moved! So, a plan formulated in my mind. I would unscrew the bolt by hitting it with the center punch in a path tangent to the bolt so that the force would shift it counterclockwise - which would, little by little, unthread the bolt. So, at hour 7, I finally got the bolt unthreaded! I celebrated by torqueing another bolt down and following torque spec, listening for the click... and listening... and Shit! I broke another bolt.
... I was this close to throwing that torque wrench into the woods before I remembered that this was the only working torque wrench I had.
2 hours, 2 lost bolts in the engine bay and 2 hammered fingers later, I took the second bolt out with the same method. This time, I was super careful with the torque wrench and listened for the tiniest click, and stopped immediately if I felt the slightest hesitation. Then, I tightened down the spark plug nuts because that was where the majority of the oil leak was (I could actually see shadows on the underside of my plenum where the hot oil leaked from the spark plug chambers and carbonized!
So after a lot of rebolting stuff back on and wrestling with the plenum again (what I ended up doing was loosening the passenger side mounting bolt so that the plenum would sit right in the middle, then I tightened the mounting bolts to a half-turn more than finger tight) I was ready to take Misty for a test drive. But first, I had to refill the coolant system with more water so that I could flush it out. So, I did so, then started the car to burp the air from the coolant system, and...
White. Smoke. From. The Engine.
Part 2 coming soon!

THURSDAY 5/7/2026

It's so over.

Two words.
Broken Bolt.
Expect an update soon.

TUESDAY 5/5/2026

Previously on ↝GARAGE ✯ MYSTIQUE↜...

Mystique gets all new brakes, and maybe some new cosmetics (if I get lucky at the junkyard LOL). Stay tuned up and tuned in!

Vanity of Vanities! All is Vanity!
I was helping my neighbor repair his car (a Kia from the early 2000s), which was a complete nightmare because the part that he was looking for was discontinued. I had no choice but to get it from a junkyard. Problem is, the part I was looking for was a suspension part (a sway bar mounting bracket, to be precise), and, well, let's just say there's a reason Ohio is part of the "Rust Belt," and it's not just because all of the manufacturing jobs were moved overseas to save the shareholders some dough. The best parts I could find still had big rust holes in it that I had to repair with epoxy, and it was so warped and tacky from rust that I had to cut the new bushings down to size in order to fit it in, and then fill in any empty space with hot glue. It will hold for now, but I desperately need to find some way to make my neighbor's car safe to drive. And to top it off, the first day I went to the junkyard, I forgot my penetrating oil, so the moment I tried to take a rusty old bolt off - the socket got irreversibly stuck. No amount of muscle could get it off. I had to come back the next day with my PB Blaster and soak it, and then hit it with my wrench a few times to get the socket off.
While I was at the junkyard, I also asked about getting a new cowl for Mystique, because her cowl was cracked from me taking the engine apart. Unfortunately, there were absolutely zero Dodge Intrepids in the junkyard. Zero Chrysler Concordes, Eagle Visions or Chrysler LHS's, either. Looks like Mystique is one-in-a-million - does that mean she's technically a classic car, since she's old and parts are hard to find for her? LOL.
I'll probably get one of my video game developer friends to create a model for her cowl in Blender and 3d-print it somewhere. But this blog post is not about Mystique, really.
It's about Diamond, and how she betrayed me.
I guess it's my fault, really. I got Diamond road-worthy for the tiny little trip to the grocery store and auto parts store that are 10 minutes away, and I got ambitious. The Monday before I started my intake manifold gasket replacement, I decided I would bike to work at my receptionist job in one of the southern suburbs of Dayton... from my apartment 6 miles away... up every single with a bike that came fresh from the junkyard and whose chain slipped off of its chainring (the gear that connects to the pedals) on my 10 minute grocery-store-auto-parts-store ride... yeah, you can see where this is going.
The bike ride actually went well, at first! Diamond performed pretty well in 1st gear going uphill, and downshifted beautifully going downhill. It was so fun to pedalpedalpedal uphill withnearly no resistance, then downshift and haul ass downhill! She was inspiring me to turn Mystique into a manual!
It felt wonderful, at first - being able to pedal so easily on 1st gear that it felt like I was pedalling on nothing. Then, 3 miles into my commute, I heard a crunch behind me, then spinning wheels, and then I really was pedalling on nothing. I set my handbag down on the ground, dismounted, and braced myself for the worst.
My worst fears had been realized - my chain had not only slipped off of the chainring, nor only slipped off of 1st gear, but also got jammed in both. I had to pedal backwards to free the chain off of 1st gear, but then that jammed the chainring even further, so then I had to pedal it while pulling the chain, which made my hands FILTHY. I had only given myself an hour to get to work, too - and I was on minute 40. Going on quickly to 45, then 50...
So, silly me, I put the chain back on and kept pedalling. Without adjusting anything. While still on 1st gear. And it happened again. On minute 50. Then 55. Then 60, 65,...
By the time I wised up to actually adjusting the low limit screw so that it wouldn't slip off of first gear (which didn't even work, anyway; I had to pedal to work all uphill in 2nd, which at least built up my thigh muscles), I was already 30 minutes late to work and counting.
So, after 30 more minutes of fearing for my life on this rickety little machine, I finally made it to work. I went to get my nametag from my bag... and felt nothing on my arm. In all of my mounting and dismounting and inspecting and repairing, I had lost my bag somewhere in the suburbs.
So that's Diamond's first major trip. She still has a very, very long way to go. Luckily for me, one of my coworkers was taking a walk nearby and found my bag, so I at least got my bag back. And afterward, my friend DD picked me up from work because it was raining hard and if I had to ride Diamond back home in the rain with a shitty 1st gear, I probably would have just swerved into oncoming traffic and ended my pain and suffering early.
Diamond, I am not done with you. You'll be a roadworthy bike soon - I just need to make you better. And one day, one day, you'll be ready to be converted to an E-bike.

NEXT TIME ON ↝GARAGE ✯ MYSTIQUE↜:
Mystique goes to her first car show! Stay tuned up and tuned in!

TUESDAY-WEDNESDAY 4/28-29/2026

Previously on ↝GARAGE ✯ MYSTIQUE↜...

I finish what I started in the engine and replace Mystique's intake manifold gaskets. Stay tuned up and tuned in!
    TOOLS USED:
  • Scissor jack and 2 jack stands
  • 8mm, 10mm, 13mm and 15mm socket & ratchet wrench
  • Torque Wrench with 3/8 inch drive that goes up to 100 foot-pounds
  • Universal joint socket
  • 3 inch extension
  • PB Blaster or equivalent lubricant
  • Plastic Razor Blades
  • Metal Razor Blades
  • Rags
  • Scouring Pad
  • Drain Pan
  • Soapy Water (1 part dish soap to 9 parts water)
    PARTS NEEDED:
  • Intake Manifold Gaskets
  • Fuel Rail Gaskets
  • Intake Plenum Gasket
  • Brake Booster Vacuum Line (3/8in inner diameter)
  • Generic Vacuum Line (Thinnest one they have at the parts store)

Jack Up? ✔

DAY 2 & 3

So, it turns out I was wrong about where the vacuum leak was coming from. But, I had already taken off my manifold anyway, so all I could really do at this point was keep replacing the gaskets - it was about time, anyway, since those things fell apart as soon as I lifted up the manifold.
First, though, I had to go to Ace Hardware to get some new bolts for the intake manifold. Whoever worked on this engine last must have lost that big intake manifold bolt and had to find a new one quick. So, they just put in some random bolt that didn't even fit - the threads were stripped so bad it was almost smooth.
After a rainy and nasty bus ride to Ace Hardware and an even rainier and nastier bus ride where I discussed the pros and cons of veganism with a funny old man back, I was ready to finish what I started.
First, I replaced the intake manifold gaskets, which wasn't super hard - I was conservative with the RTV, and put it only on the corners so that the gasket wouldn't move around when I put the manifold back on. Then, I replaced the fuel rail gaskets and then the fuel rails - for those, I didn't even really need the RTV. I did need the RTV for the radiator line at the back of the intake manifold that the fuel rail also bolts onto. I couldn't find a torque spec for that, so I just tightened it as tight as I could by hand. I didn't see any coolant leaks, which means it probably worked.
Now the hard part: the plenum. This thing has possibly the stupidest design on the planet. The gasket is flat and so are the mating surfaces, so if you're not careful you will put the plenum on and the gasket will shifted a quarter of an inch to the left or right or up or down or wherever, and long story short you won't seal anything with it. What I did was I took inspiration from the redesigned Chrysler 3.5l V6 from the Dodge Charger and glued the gasket to the bottom of the plenum with some RTV so it wouldn't slip, then carefully placed it on the manifold. It took me a few tries and I jammed a few wires and hoses trying to put this thing back on, but I eventually got the engine back together. Then I just reconnected all of the hoses and wires (except for one that I forgot; we'll get back to that later), put in the fuel relay, reconnected the battery, filled up her coolant tank with some distilled water and coolant system cleaner, and started Mystique up!
And... she still had a major vacuum leak. It was super annoying - so I checked again where the hissing was coming from. It came from the driver's side of the engine, so I figured it was the brake booster hose, since that was (one of) the only hoses on that side of the engine. I replaced that with some bulk 3/8" diameter vacuum hose I got from the auto parts store, and started Misty up again. Again, I still had the vacuum leak.
So, I did what I should have done a long time ago... I checked my manual. Turns out, there is a vacuum reservoir hose on the side of the car, next to the fusebox, that hooks into the plenum between the brake booster hose and throttle assembly. I had broken off that hose and completely missed putting it back together the first time I reassembled my engine, when I was putting my valve cover gaskets in. That means I was going to have to go to the auto parts store again and get some more vacuum hose. This time, I got the thinnest vacuum hose they had (7/32", I believe) and reconnected the vacuum reservoir to the plenum. Finally, after starting Misty up for the third time...
No vacuum leak! Thank God. I gave her a test drive just to make sure she was running smoothly, and then went back home. Now Misty has absolutely nothing wrong with her engine or transmission! All that's left to do now (that's URGENT) is replace her brakes, because those things have been squealing like slaughtered pigs.

NEXT TIME ON ↝GARAGE ✯ MYSTIQUE↜:
Mystique gets all new brakes, and maybe some new cosmetics (if I get lucky at the junkyard LOL). Stay tuned up and tuned in!

DAY 1


The Iran War is killing thousands, the president's long gone nuts, and the oil executives are picking at his corpse. And because of this, gas is $5 a gallon. All that to say, in these inhumane times, it's not economically or morally wise to drive with a vacuum leak and a single-digit MPG. So, that's what I went to fix this week.
I can tell I have a vacuum leak because not only is my MPG down like crazy, there's also a sucking noise coming from the engine bay. I figured I might as well replace the intake manifold gaskets, since I already messed up the intake plenum gasket and the intake manifold gaskets were probably old and bad.
Thankfully, my experience with the valve cover gaskets made tearing the engine apart much quicker. This time, I drained the coolant because I would be t aking off the lower intake manifold and I didn't feel like getting dirty coolant all over me.
And dirty it was! I jacked Mystique up, and then I took off the radiator cap on the overflow tank and located the draincock, which was the flat knob on the passenger's side of the car. There's a handy-dandy drain hole in the rubber weather cover underneath, which helped me find it, but I still had to snake my hand through and twist it open with a pair of needle-nose pliers. Once the coolant started draining - oh my gosh. The coolant that drained out was the color and smell of vanilla extract, but with an almost oily sheen to it. You definitely don't want to put this in your cake batter.
Afterwards, I relieved all of the fuel pressure by taking out the fuel pump relay and cranking the car until it couldn't crank anymore, and then took off the negative terminal on the battery (note to self - this battery needs replacing. The terminals look like the Statue of Liberty took fat green dump on them). Then, I took all of the electrical connections and hoses off (making sure this time not to break anything or lose any bolts!) and unbolted the plenum from the intake manifold - if you need directions on which connections are which, consult my blog post on the valve cover gasket replacement.
After I took the plenum off, I could see my work and how shoddy it was - the paper was already ripped and only a thin layer of RTV was holding it on. I was going to scrape off the intake plenum gasket from the lower intake manifold right then and there, but I figured I was going to take the lower manifold off anyway, so I would just scrape the gasket off when I could handle the lower manifold apart from the rest of the engine.
But first... I had to take care of the fuel rails. I unbolted the 10mm bolts on the fuel rails, which was easy enough. Now, there are exactly zero tutorials on how to get the fuel rails off of a 3.5L V6 LH car. The closest I could find was some videos on how to take off fuel rails for the 2005-2010 Chrysler 300, which is close but there are still significant differences. For example, instead of one connection to the fuel line, there are actually two differently sized connections for the fuel rails to the fuel lines. Thankfully, they came with black plastic disconnector fittings already installed, so all I had to do was push the fuel line into the disconnector until the disconnector clicked into the line, and then pull away. A little bit of fuel dripped down, but I already relieved the pressure in the line so the amount was extremely negligible. Still, it would have been better to catch some with a cloth. I unbolted the mounting bracket from the coolant hose in the back of the intake manifold toward the firewall (I couldn't find any torque specs on that, but when I checked them with my torque wrench it was clicking all the way down to 5 foot pounds, so I resolved to tighten them as much as I could), and then removed the fuel rail, being careful NOT to drip gas on myself.
Finally, it was time to take the lower intake manifold off. First, I unbolted the two bolts for radiator hose in the back near the firewall with a 10mm wrench. Then, I took off the bolts with a 13mm socket, making sure to note that there were two bolts in the front next to the upper radiator hose that were longer. Finally, I disconnected the electrical connector in the front next to the upper radiator hose in the front of the engine bay, and the radiator hose itself. The smell that hit me when I took opened that radiator hose made me understand the horrors Lovecraft evoked in the Shadows over Innsmouth - namely, the smell of rotting fish.
Enough of that - I removed the lower intake manifold from the car and marveled at just how easily the gaskets fell apart. These were definitely in need of replacement. I also marveled at the literal rat's nest inside of the engine, in the valley between the cylinders. It looked and felt like drywall insulating foam mixed with acorns from some chipmunk that must have been living in there years ago. That chipmunk will just have to go hungry this winter.
I did my best to take out all of the fluff inside the engine (making sure not to drop any inside the cylinders themselves!), scraped off all of the gaskets on the intake manifold (thankfully, these were NOT slathered in RTV, so I could just use a plastic razor blade to take off the easy parts and a metal razor for the hard spots), then went to replace the bolts, when I noticed a slight issue; one of the bolts was not like the others. I suspect the person who worked on Mystique previously, like me, had butterfingers and dropped one of the super long bolts, never to be found again. So, that meant a trip to Ace Hardware to get a new bolt... except by the time I needed to get to Ace Hardware, it would have been closed if I went by bus, and I really didn't feel like taking my bike when she was prone to failure on long rides. So, I would need to wait until the next morning to get the right screw. If I had all of the right parts, it would have taken me only a day to get this done, so I took pride in that, cleaned up all of my tools, and went to bed.

MONDAY 4/20/2026

Previously on ↝GARAGE ✯ MYSTIQUE↜...

I finish what I started in the engine and replace Mystique's intake manifold gaskets. Stay tuned up and tuned in!
But first...
    TOOLS USED:
  • Metric Allen Key Set
  • Phillips Head Screwdriver
  • Chain Breaker Tool
  • 15mm Socket and Wrench
  • Soapy Water (1 part dish soap to 9 parts water)
  • WD-40 or equivalent chain cleaner
  • Allen Bike Rack or equivalent bike rack
    PARTS NEEDED:
  • 7-speed Derailleur (Shimano Touring or Equivalent)
  • Bike Chain (7-8 Speed or higher)
  • Inner Tube

On Rack? ✔


I got tired of riding the bus to the auto parts store, especially when it's a literal 5 minute car ride there, so I decided to get a bike! Problem is, I hate spending money on stuff (I mean, Misty was literally a Facebook Marketplace find), so on Sunday I went to a free bike giveaway to see if I could find anything. I did... I found many parts of bikes, but all of the good bikes were already taken by the time I got there, so all I got was a rusty bike frame and a basket and a few wheels that didn't even fit. I would need to find a real tire for that frame.
The next day, I went to the junkyard to see if I could find a 26 inch single speed wheel (say the 3 times fast). Luckily, there was a little spot in the junkyard for bikes. Unluckily, there were no wheels that would work with that frame I got. But then I saw her...
She had a purple frame, rusty chain and thick tires. She had cruiser-style handlebars for commuter style handling, and a 7-speed cassette (that's the stack of gears on the back of a bike) in case I needed to make a quick getaway. She could even be ridden straight from the junkyard! Not well, but she could.
Of course, I had to get her. And for $10, she was mine. The first thing I did was take her to the bike shop to see what I needed to fix on her.
The bike shop told me that she needed her chain and derailleur replaced, so for $30 I got those and a new derailleur wire and got to work.
The wonderful thing about bike repair is, I don't have to jack anything up or do any crazy wiggling around the engine bay or underneath the car. All I had to do was lift her in the air a bit - which I did from a $5 bike rack I got from a garage sale. I hung her up and got to work on the bike's inner tube, which was easy enough - I took off the wheels using a 15mm socket wrench, deflated the tube by pressing something small into the Schrader valve, then pried the outer tire off of the rim with two screwdrivers. Then, I took the inner tube out, replaced it with a new half-inflated inner tube, and then put everything back together.
The chain was easy enough - just needed to pop out the old one with a chain disconnect tool and put the new one in. I did have to resize it and I put on the master link with a pair of needle nose pliers. Now, the derailleur - that was horrible. I had no idea what I was doing, and I must have spent 3 days trying to get the derailleur to not slip. Eventually, after a Park Tools video and a lot of patience, I got a foggy idea of how to do all of this. The first thing to do (and probably only thing I got right on the first try with this) was to take the wheel off (again with the 15mm wrench), take off the old derailleur (after dislodging the chain from it by ripping it apart), and putting the new derailleur in the old one's place. Good thing about this bike is, it has a built-in place in the frame to put the derailleur in the right position. Bad thing is... well, you're about to find out.
The original shifter cable was completely chewed up and it was impossible to get any good tension. After getting a new cable, I got a better idea of what was going on. The more tension in the system there is, the lower the gear would be. I just had to make sure I had enough tension on the high gear to begin with (so just pull enough on the wire when it's on gear 7 and clamp it down by putting it in the clamp screw, set the high limit screw so that the chain won't slip off of the smallest gear with a Phillips head screwdriver, shift to each gear and adjust by pedalling and listening for bad clicking noises and turning the fine adjuster (the twisty thing that the wire goes into) until there is just a regular smooth noise, and go to the lowest gear and adjust the low limit screw with the screwdriver so that the chain doesn't slip into the spokes. All that's left to do now is go on a ride!
I took her to the auto parts store first because I needed to get some fuel injector O-rings for Mystique. The auto parts store didn't have that, though, so I went to the grocery store instead and got some veggies to cook. Then, I went back home on the bike, and turned a 2 hour bus ride trip into a 45 minute bike ride.
So, please give a warm welcome to the newest member of my fleet: Diamond, my purple 7-speed cruiser bike! Now that I have her, I won't ever be stranded again! (FORESHADOWING)

NEXT TIME ON ↝GARAGE ✯ MYSTIQUE↜:
I finish what I started in the engine and replace Mystique's intake manifold gaskets. Stay tuned up and tuned in!

THURSDAY 4/16/2026

Previously on ↝GARAGE ✯ MYSTIQUE↜...

I finally fix Mystique's transmission, and take apart her backseat to install some seat covers. Keep your car tuned-up, and yourself tuned-in!
    TOOLS USED:
  • Scissor jack and 2 jack stands
  • 10mm socket & ratchet wrench
  • Torque Wrench with 3/8 inch drive that goes up to 100 foot-pounds
  • Universal joint socket
  • 3 inch extensions
  • PB Blaster or equivalent lubricant
  • Utility knife
  • Screwdriver or Pry Bar
  • Hammer
  • Rags
  • Scouring Pad
  • Drain Pan
  • Soapy Water (1 part dish soap to 9 parts water)
    PARTS NEEDED:
  • Transmission Pan Gasket
  • Automatic Transmission Fluid Filter
  • Extra ceramic magnets (in case you lose the magnet in the bottom of the pan like I did lol)

Jack Up? ✔

So, you heard about Mystique's vacuum leak from last time. That's not been addressed yet - I'm still kind of traumatized from having to do the valve cover gaskets - but on the bright side, at least she's not leaking oil now! I'll get that done next week once it's a little warmer. That's not the most pressing issue, anyway.
That would be the leaking transmission. I remember very clearly - I was at my parents' house running some errands for them and went to pull out of their garage. Well, I forgot to get something from them, so I left the car in the driveway and went inside to get it... and almost slipped on a big, red puddle where the transmission pan was. Not a fun way to find out that you have a tranny leak.
Luckily, this is not a hard fix - kinda. The guys at the transmission shop lied to me and told me there was nothing wrong with her, so I believed them and kept driving on a slipping transmission. There might be permanent damage to first gear now, but that lowkey doesn't matter cuz I'm planning on doing a manual swap anyway. I just need to keep her running until I can find all of the parts for a swap.
So, first thing to do was jack up the car in the front. Then, I located the transmission pan. Unfortunately, it was a little bit farther in than the oil pan, so I really had to squeeze underneath to reach it. I should have jacked the car up even more, but that's a lesson I'll keep for when I'm doing a swap.
So, next thing to do was get rid of all of the bolts. I set my drain pan under the transmission pan and got to work. There are 13 10mm bolts that hold the transmission fluid pan on the car, and I took them off one by one, starting from the back of the car and moving forward. I kept one bolt on in the front to act as a hinge because once I dropped this pan, tranny fluid would go everywhere. That's what was supposed to happen, anyway. Unfortunately, Mystique's transmission hadn't been serviced since she rolled off of the production line, so that gasket was STUCK stuck on there - definitely with RTV, too.
Terrible flashbacks to the bonded-on plenum gasket came back to me in waves of nausea, so I had to get out under the car and really quickly throw up for a second before I kept going. First, I tried hitting the pan with a hammer to get it loose - not only did it not work, but the rag that I wrapped the hammer with did nothing, and I ended up with a small dent in the pan for my trouble. So, plan B - cut the pan free. I took a screwdriver to the pan and pried open the tiniest corner, then went in with a utility knife. That also failed, and the blade actually broke and was lodged inbetween the mating surfaces.
At this point, I was willing to try anything, and I mean ANYTHING, to get it loose. What I ended up doing was this: I unscrewed the last bolt in the back. Then, I took my screwdriver and pried up one corner, then took my utility knife and a hammer and chiseled at another corner. Once that corner was loose, I pried the screwdriver corner with everything I had - and as I pried hard, I cut the gasket in the corners as well until it was loose enough to dislodge just by prying. I pried from the back of the pan so that no tranny fluid would drip onto any exhaust pipes, and luckily, Misty didn't get drenched in tranny fluid. The same cannot be said for me.
Actually, I did a decent job getting most of the fluid in the pan, but some of it splashed out onto the asphalt of my apartment's parking lot and mixed with the little bits of glass and dirt there. Lesson learned that day - next time I work under the car, get a piece of cardboard under there so I don't get tetanus or an infection from the crap on the ground. But onto the transmission pan!
The transmission pan was full transmission fluid that looked and tasted like blood. My friend A-Dawg loves tasting fluids from her car so that she can tell what fluid might be leaking out, so don't go thinking I'm nuts (untrue) or that I have pica (not anymore). It's a perfectly legitimate mechanic technique that I learned from the best - and what I learned from that taste test was that like blood, the transmission fluid was absolutely filled with metal. The pan magnet at the bottom of the pan literally had a metal slush that formed a blob around it. I cleaned it all up with some soapy water and a rag, and took out the magnet to clean it. And promptly lost it.
That would be a problem, but I had more pressing things to worry about, like scraping off the gasket. Luckily, the RTV that made up the gasket was inundated with transmission fluid oil, so I just scraped it off with a plastic razor blade and scrubbed off anything remaining with a scouring pad. Then, I went on the underside of the car to remove the transmission fluid filter.
In hindsight, I should have used one of those weird star-shaped screwdrivers, because the filter was clipped on with clips that were bolted on with those star-shaped bolts. Unfortunately, I'm cheap and I don't like buying a bunch of parts if I'm not even going to use them again, so I just unhooked the old filter with a lot of difficulty... and drenched myself in the excess fluid that was in the filter. Great. And I had work at my little receptionist job the next day, which was even better. But whatever - if I didn't get Misty done tonight, I wouldn't have a car to take me to work anyway, and I'd have to take the bus - which isn't that bad, but I hate having to wake up early for that.
I clipped the new filter in, making sure that the fittings went into the correct holes. Then, I had to ask my friend DD to take me to the store to get some magnets for the bottom of the transmission pan. The thing about DD is that she's an amazing baker, and on this day, she brought me some vegan banana bread that was absolutely delicious, even if I ate it off my dirty, transmission-fluid-covered hands. We got the magnets (and a few other tools that I'll need to do my intake manifold gaskets) and got back home, and then it was as simple as putting the new magnet on the bottom of the transmission pan, then bolting it back onto the valve body. Then, I filled Misty up with 4 quarts of transmission fluid (I needed ATF+4, in case you're wondering) and some Seafoam Trans Tuner and gave her a test drive - and she drove smooth as butter!
To celebrate, I took a nice, long, hot shower with lots of dish soap and DD and I had some more of her banana bread and some pizzas that we got for free. And that's how I fixed Misty's biggest problem - for now.

NEXT TIME ON ↝GARAGE ✯ MYSTIQUE↜:
I finish what I started in the engine and replace Mystique's intake manifold gaskets. Stay tuned up and tuned in!

WEDNESDAY - SATURDAY 4/8-4/11/2026

Previously on ↝GARAGE ✯ MYSTIQUE↜...

Mystique gets some new cosmetics, and a grim diagnosis! Also, I pull the hoverboard apart even more, in service of creating an E-Bike - I will even have pictures to show! Keep your car tuned-up, and yourself tuned-in!
    TOOLS USED:
  • 10mm, 13mm, 15mm socket & ratchet wrench
  • Torque Wrench with 3/8 inch drive that goes up to 100 foot-pounds
  • Universal joint socket
  • 6 inch extension and 3 inch extensions
  • PB Blaster or equivalent lubricant
  • Razor Blades
  • Rags
  • Drain Pan
  • RTV Gasket Maker
  • Soapy Water (1 part dish soap to 9 parts water)
  • Mass Air Flow Sensor (MAF) Cleaner
  • Throttle Body Cleaner
  • Paint Thinner
    PARTS NEEDED:
  • Valve cover gaskets
  • Fuel rail gaskets
  • Intake Manifold gasket
  • A couple extra lengths of hose, in case you break some hoses (this is a 30 year old car, after all)

Jack Up? ✖

DAY 4


The end - but not really.
Remember how I broke three hoses trying to get the intake plenum off? Well, now it was time to put the intake plenum back on. And let me tell you - it's a lot harder to put stuff on than take stuff off.
But first - the gasket's off! I had to chisel it off with a screwdriver by the time I had gotten to the last 10% of it, it was so stuck. The little bits of gasket came off in little curled shavings like the dark chocolate shavings you see on those bougie birthday cakes. All that was left to do now was put the new gasket on and put on the plenum. Easy as pie, right?
I covered one side of the plenum gasket with RTV and stuck it on the mating surface, then put the entire plenum back on. And then off, because it wasn't seated right. Then on. Then off. Then on. Then off. The fourth time I went to put the plenum back on, I realized my mistake - the paper plenum gasket was torn in the middle, enough to make two holes fuse into one.
I figured it would at least hold until I could get a replacement, so the fifth time I went to put the plenum back I carefully negotiated it back in and tightened down the bolts in the middle. Then, as I was tightening the bolts, I noticed a little black flash on the white subframe. I grabbed my grabby tool to look at it and lo and behold - it was the missing mounting bracket bolt! I took it and restored it to its rightful place along with its twin. Then, I reconnected all of the hoses, repaired the hoses that needed to be repaired - the radiator hose I got wasn't exactly right for the PCV system, but it would serve its purpose well enough for now - and then I put the fuel relay back in, reconnected the battery cable, and then cranked her up.
...
Mystique ran beautifully! Or, beautifully enough until I got a check engine light. I plugged in my OBD-2 scanner, and all it was was a rough idle - probably from a vacuum leak. No biggie - that's a solidly "later" issue for me, and it was likely the PCV hose anyway - that or the intake plenum gasket. I hope it was just the hose, but if it is the plenum, then I'm not gonna be worried about that either, because I just replaced the valve cover gaskets on Mystique and gave her a new lease on life! Now, as long as I'm in drive or reverse (and I overcome that slipping 1st gear), I can go as fast as I want! I got her some cool green tire valve caps to celebrate her valve cover gasket replacement, and my friend got me some sick purple and green LED dome lights to celebrate my birthday. I think I'll do some highway driving to show them off!

NEXT TIME ON ↝GARAGE ✯ MYSTIQUE↜:
I finally fix Mystique's transmission, and take apart her backseat to install some seat covers. Keep your car tuned-up, and yourself tuned-in!

DAY 3

I wonder how much cancer I've gotten from this paint thinner since I started this project. I've gone through almost half the can I got from the hardware store - and I still hadn't even come close to finishing the scraping.
It's useless to keep hacking at it without doing something productive first, so I decided to go to Ace Hardware to get some replacement bolts for the valve cover and the mounting bolt. The reason I specifically said Ace Hardware is because they actually have the appropriate hardness. Most hardware stores only have bolts that are appropriate for wood and maybe some machines. Ace (and other specialty hardware stores) have the 10.9 hardness (grade 8 for the SAE girlies) that won't shatter inside the car. I got myself those screws (and an extra for each, in case I lost ANOTHER bolt) and got to work.
First, I had to replace passenger side valve cover. Thank goodness those valve gover gaskets are made of rubber, they were so easy to take off and put on. They even came with handy little rubber hooks to keep them hanging on the valve covers! How cool!
They bolted on easy - I started from the middle and torqued each one down to 21 Foot-Pounds. Then, I had to put the AC compressor back on its mount. Unfortunately, I made two mistakes. First, I unbolted the compressor from the mount and the mount from the engine when I was just supposed to do the latter. Second, I unbolted the mount so that the bolt in the back was holding it - which meant that unless I unbolted and rebolted the heavy ass compressor back, it would be mounted crooked, and possible break off and roll down the road. And I wouldn't have air conditioning.
So, after 30 minutes and a lot of cussing, I unbolted the mount, rebolted the mount, then rebolted the compressor. I still feel like I lowkey cross-threaded a bolt, but that's an issue for future Xtine to handle.
After that, I tackled the gasket again. And again, it took me even longer, but by the end of the day, I had gotten about 80% of the gasket off. All I had to do now was scrape off the rest, and there would be no big breakthroughs and large pieces coming off this time. Each bit would see me carving off bit by bit by bit, and then buffing out any scratches I made with a scouring pad.
That was literally the rest of the day. Just scrape, spread paint thinner, scrape, spread paint thinner, rinse and repeat. I worked until it got too cold outside to do this, as I listened to some Empire! Empire! (i was a lonely estate) and contemplated how powerful Misty would be after I finished this. The Chrysler 3.5 liter V6 engine is supposed to be able to produce 214 horsepower. Scraping off this gasket, I couldn't help but feel like I was grooming Mystique just like a racehorse, so that she can run her best. There's nothing I wouldn't do for my beautiful, beautiful beast, even if I lose days off my week from having to scrape this stuck on gasket or years off my life from breathing in paint thinner fumes.

DAY 2


A new day approached, and a new strategy crossed my mind. I wasn't taking the plenum off to replace the plenum gasket - I was doing it to replace the valve cover gaskets! So, I decided to handle that right off the bat.
The driver's side valve cover was where I think I was having the oil leak. After taking off the clip with all of the cylinder sensors, unscrewing all of the bolts and the spark plug nuts, I took off the valve cover.
Inside, the rocker arms were FILTHY. There were absolutely drenched in old oil. I think this was where I was having my leak. Another clue was that the PCV valve hose that connected to the valve cover was completely and utterly destroyed. The whole thing felt squishy and the huge hole in the side of it was so badly abused by the heat of the engine that the area around it looked like there were little squares cut into it. So, I think I found my valve cover leak.
Replacing the gaskets was an extremely easy fix. All I had to do was clean up the valve cover mating surfaces (and the valve covers themselves, since they were abysmally grimy). Then, I just put the new valve cover gasket on, put the valve cover on, tightened the bolts, and that was valve cover gasket number 1 done. Easy peasy.
The other one was not so easy.
Remember how I said that this car is a "cab-forward" car, and how it makes everything in the engine bay cramped? Well, that includes the passenger side valve cover. I thought it would be as simple as just removing all of the bolts on the valve cover like the other one (wrong!). I was prevented from removing the valve cover by the AC compressor. So, what I had to do to get that thing off was unbolt the screws for the mounting bracket for the compressor. Well, the manual didn't really explain what was the mounting bracket and what was the compressor itself, so I ended up unscrewing both. This would later come to bite me in the ass when putting it back on, but for now the valve cover was removed.
In all honesty, I should have never replaced that valve cover gasket - the rocker arms looked clean, and I ended up losing ANOTHER bolt trying to unscrew the bolt behind the coil pack mounting bolt. Like, dropped-into-the-engine-bay-never-to-return lost. So, unless I found that bolt somehow, I was never going to get that valve cover gasket repair done.
At this point, I decided to go to the auto parts shop AGAIN to get some more parts. But first, I had to go to the hardware store to get something to take that intake plenum gasket. I had read that paint thinner can work to soften silicone based gasket maker. I got some paint thinner, some plastic razor blades, and a paintbrush to paint on the paint thinner. Then, while waiting for the bus, I got some falafel and was floored by this couple dumping their half-eaten (and I mean HALF-eaten - there were still huge chunks of meat and a bunch of rice!) plates in the trash, and then telling the workers behind the counter that the food was "phenomenal." I never would have guessed.
Anyway, I took a bit of my falafel sandwich and promptly dropped a falafel right on the floor. Story of my life so far.
After the bus picked me up, I went to the auto parts store to grab some hoses to replace the old hoses that I broke, as well as a magnetic pick up tool. Unfortunately, I didn't feel like spending $20 on a PCV hose when I could just get it from Rockauto for like $10, so I got a radiator hose as a quick fix, and some hoses for the other little things, and went back home.
Or tried. I took the entirely wrong bus, and I ended up in the middle of the city's central bus hub, and the next bus home would take about 45 minutes to get there. I figured I might as well walk and enjoy the sunshine.
As much as I love Mystique, there is something to walking around the city. In a car, I feel like I'm in my own little bubble, isolated from the rest of the world, imposing myself on the street. On foot, I am the street - my shoes plaster themselves to the sidewalks, my eyes interface with the signs, and I can even look inside the stores and find out that the local appliance store boss is a Jesus freak, the local auto parts store boss is a Jesus freak, the local optometrist is a Jesus freak ... Actually, I think everyone in Dayton with money is a Jesus freak. I guess all the daily bread they get from the Father lets them reinvest their grocery money into their businesses.
After miles and miles, I got back home, painted on the paint thinner on the intake plenum gasket, and waited a few minutes while I looked for my screws, with no luck whatsoever. After that failed attempt, I attacked the gasket with a straight razor blade, and...
Success! Well, actually, success. Let's not get too excited - only a corner of the gasket came off. The rest was still stuck badly on there, but now I at least had an opening. I worked at it through the entire rest of the day, but was only able to clear about a third of the gasket - it was that stuck on. Even worse, the razor blade made very light gouges in the plenum - nothing that couldn't be buffed out by a scouring pad, though. I painted on layer after layer of the paint thinner on that gasket, and while I was waiting for it to soak in, I handled the fuel rail gaskets that were right next to the intake plenum gasket. That was significantly easier - kind of. I had to unscrew the fuel rails from the manifold, but they still didn't come all the way off. It gave me enough room to maneuver them out of the way to scrape off the gasket. This took about 40 minutes, but I actually got it done! Hooray! Afterwards, I torqued the rails back on to 8 ft lbs, and then put away my tools and went to bed.

DAY 1


Have you ever stepped in a pile of dog shit, and in an effort to wipe it off, you end up embedding the crap deep in the grooves of the sole, which means you have to source some kind of tool like a pencil to dig it out, only for the pencil to be too big, so you have to find something thinner like a popsicle stick, but the popsicle stick is too big, so you have to hope and pray that you find a paperclip on the side of the road or something (because who just has paperclips lying around at home?) and at the end of the day you spent 50 minutes trying to fix a 5 second mistake?
Anyway, I started replacing my valve cover gaskets.
I probably shouldn't have even done the valve cover gaskets in the first place, since the engine works OK for now - it just has some loss of power every now and again. The real issue with Mystique is the transmission fluid pan and filter - she is leaking fluid like crazy. A-Dawg and I noticed her hard-shifting, and I brought her to a transmission shop to have her inspected. I should have known they would lie to me about her being totally fine transmission-wise - the first shop I took her to refused to even look at her (because it's "hard to source parts for the Dodge Intrepid." Uhh, do a little research and realize that literally 4 or 5 other Mopar cars use the exact same transmission, including the 300M?) and the second shop that's in the same chain gave me that disclaimer too. Well, whatever - what's done is done, and all I can do now is fix her. At least she ran without problems when I put some Seafoam transmission conditioner in her - so I think all I need to do is stop the leak and I'll be fine. I'll do a manual swap one day - just not today.
Because today, I did the valve cover gaskets. Correction - I am doing them. The manual said that this would be a 3 hour job, and this is rapidly turning into a 3 day job. My hubris amazes me sometimes.
Here's how it all started: I replaced the air filter. Easy enough, right? Just took out the fuel pump fuse, relieved the fuel pressure the cranking the ignition for 16 seconds, disconnected the battery using a 10mm socket, then undid the box with a 10mm, undid the hose by hand, took off the top off the air filter box, then took out the old filter, put a new one in, and closed it up by reversing the process. It took me all of 20 minutes to do at most.
Here's where it gets tricky - the next thing I did was remove the intake manifold plenum. It's that big shiny aluminum piece on top of the engine that has one zillion wires and hoses connected to it, and what it does is it sucks air and gas into the car in order to give it the fuel it needs to keep it going. Well, one by one, I took all of the wires and hoses off, being careful to not break anything. Of course, with a 30 year old car that has been sitting since the death of the previous owner, I broke stuff.
The first things to remove were easy enough - the accelerator and speed control cables were no issue at all, because they just unhooked from the throttle bodies on the driver's side (by the way, TWO throttle bodies?? What?? Chrysler really spoiled us the with 3.5l V6).
The next thing to unhook was the brake booster hose, which was on the same side as the driver's side - it's the hose that has the clip on it. This one's really important, because without it, you'd need to really stop a hole through the brake in order to actually stop! (slight foreshadowing). The manifold absolute pressure sensor is pretty much right next to it, and you just unplug it. Easy peasy.
Next, I tackled the purge hoses on top of the throttle bodies. There was one for each, and unfortunately, this was where I started running into problems. When I was in the middle taking out one of the purge hoses, the brittle plastic actually snapped and left me with a broken line. Wonderful.
Next was the Idle Air Control Motor on the top middle of the plenum - easy enough, just lift up the little plastic tab and unplug it. The intake air temperature sensor in the bottome middle of the plenum was easy enough to - again, just take the plug out. The Manifold Tuning Valve sensor was the hard part - that rubber in the hose was practically baked solid on the valve, and I had to actually take a pair of pliers and pull. It pulled off of the valve, but not before getting a nasty little gouge for my efforts. Fortunately, it didn't break that hose - I can't find any replacements for the MTV hose anywhere online so if I broke that, I would really be in big trouble.
Working on the passenger's side, I disconnected the air intake hose from the filter box to access everything, disconnected the Throttle Position sensor, then the two hoses on the side that I think might be some brake check valves of some kind. Unfortunately, I broke both of those brittle plastic hoses. Just my luck.
Finally, I unscrewed the metal EGR tube at the back of the plenum (be careful to keep the gaskets if your kit didn't come with them!), removed all three of the hoses that connect to the main air intake hose in the back, then unscrewed the two mounting bolts on the side brackets (one on each side) and the four screws on top. Then, I promptly dropped one of the side mounting screws into the engine bay. What's even worse, I didn't hear the little "clunk" from the screw hitting the asphalt, which means that black screw was now in the pitch-black recesses of the engine bay... the cab-forward engine bay... the cab-forward engine bay that the Chrysler engineers designed to be as small as possible to give passengers more legroom... the cab-forward engine bay that I didn't have a prayer of getting my hand in to rifle around for it. Basically, until I found it, I wouldn't be able to drive the car even if I wanted to.
I guess this was the point of no return. All I could do was keep going and hope I could find the screw as I removed more of the intake manifold. So off the manifold came. It was kind of a heavy piece - it was also filthy from disuse, and the throttle bodies in particular were absolutely caked in carbon.
After suiting up in some gloves, safety glasses, and an N95 mask for good measure, I held the manifold over an oil drain pan and hit the outside with soapy water and a rag to polish it to a nice, shiny finish. One day, if I replace my head gasket, I'll put a purple or green powder coating on it, but not today. I also separated the throttle bodies from the plenum, replaced the gaskets, and cleaned those throttle bodies out with an old toothbrush and a whole bunch of carb cleaner. The cool thing about having two throttle bodies is, if you forgot to take a before and after cleaning picture of the throttle bodies, you can just do one after you cleaned one off.
Now, it was starting to get late, and after cleaning the manifold, I decided it was time to tackle the intake plenum gasket. The new intake plenum gasket was made of paper, so I figured, how hard could it be? I stuffed the holes with a torn up plastic bag so no bits of gasket could drop into the engine, took the screwdriver that I had gotten to scrape off any stubborn bits of gasket, aimed it right at a corner of the gasket, pushed, and...
...
Nothing happened. The manifold stayed put, the screwdriver stayed put, my body stayed put. The only evidence I had that I had even attempted to remove it was the little friction burn I got in my hand from pushing too hard. I think the gasket was made out of pure RTV or something - it was some black silicone thing and it was completely baked on and bonded onto the aluminum of the lower intake manifold. I tried again - nothing. I tried again - and again, nothing. Fourth time's the charm, I guess - I came at the gasket with a running start and got somewhere! Namely, headfirst into the windshield.
At this point, I couldn't just replace the intake plenum without replacing the gasket as well - the old one already cracked - so I decided to head to the auto parts store to grab some supplies to at least try to free this gasket from the manifold.
After a quick bus ride, I got to the auto parts store. I got a set of plastic putty knives (since I read that you're not supposed to hit aluminum with any metals besides brass - aluminum is very sensitive). Then, after waiting a few minutes, I got back home and tackled the intake plenum gasket with those plastic putty knives.
They did absolutely nothing. I threw up my hands and went to bed - I already figured this would be a 2 day job anyway, so I dreamed that night of clean mating services and satisfaction.

THURSDAY - SUNDAY 3/26-29/2026

Previously on ↝GARAGE ✯ MYSTIQUE↜...

Mystique and I hit the road to Boston. I also got a free Hoverboard, so now I am investigating E-Bike schematics. Stay tuned!

PART 4


Day 2 of PAX was a blast. It was a day of more games, TTRPGs and board games (I saw this really cool one about building robots to battle your friends - kind of like a mix of Voltron and Yu-Gi-Oh), and panels. But first, I had to park Misty.
I have to say, for all of Boston's strengths, it does have one fatal flaw - there is absolutely no free parking there. Everywhere there was a parking meter, a parking garage - but no regular ass free parking space. Apparently there's free parking in Boston on Sunday, but I needed to be back home by Sunday, so I had to shell out some cash to park another place.
Or so I thought - the parking meter that we parked at was broken. Like, Roxy and I were there trying to get this thing to work for 15 minutes before this real Bostonian (I could tell - he had a bag of Dunkin' donuts riding shotgun in his beater station wagon and the voice of Mark Wahlberg) told us we could pretty much just park there for free if it was broken. I do pretty much the same in Dayton anyway, so we parked Misty there and set off for PAX once again.
The parking spot was kind of far from the convention center, but in a different direction, so we passed over another part of the Boston Harbor. We saw the ship where the colonists threw the tea overboard there, and even got a picture of it! I wonder - if you took a big straw to the harbor, would it taste like tea? It's definitely had a lot of time to cold-brew.
After we passed by the harbor, we were at PAX once again, and this time we didn't mess around - we played as many games as we could and made as many friends as we could. I played some games from the Critical Reflex booth (they're the ones who publish those PSX graphics horror games, like "No, I'm Not A Human." I played a detective game from them), and then I checked out an anime-style visual novel called Rain98, which was pretty good, until the part where the player character had to put on some girl's socks. That was a bit... Freudian.
Also, there were some great games from solo devs - there was hack-and-slash game that looked like a black-and-white shonen manga that I unfortunately can't remember the name of, but it was super stylish. There was another game called "Royalty Free-For-All," which was a platform fighter whose characters were all public domain characters like Lancelot, Dorothy from the Wizard of Oz, Sweeney Todd, etc. I was never great at Smash Bros - I could hold my own with Wario, but my older brother would always destroy me - so I didn't do great playing Lilith in this game. Still, it was a lot of fun - the controls were responsive enough that I couldn't blame the controller for losing.
Roxy and I met the queer gamer group again, and we talked a little more about their plans for making games before we had to leave. I had to attend my church's Palm Sunday service on Sunday, and I had about 14 hours to travel, so before we got too comfortable in Boston, we left - much to Misty's chagrin. I think she liked it in Boston among the EVs, because it her biting back a few times when accelerating to even move.
From there, it was smooth sailing - Roxy and I stopped by a Taco Bell to get some grub first, and then we drove over to her place. She took over so that I could get a rest before my 8 hour solo drive back to Dayton, and I fell asleep in the passenger seat listening to Brennan Lee Mulligan pretend to be a haunted and traumatized adventurer on a DnD podcast.
A few hours later, it was my time to drive. After a big cup of instant coffee and some more Kenyan rice and beans and cabbage at Roxy's place, I set off, avoiding the toll roads so that I could make it back to Ohio with my sanity and bank account intact.
The drive back was perilously boring in the way every late night 8-hour drive is. The darkness of the road made it impossible to enjoy any landscape I drove by. The only thing I could see was the road ahead, made merely hazy by Misty's cloudy headlights. My only companion was the Bill Withers cassette that I brought with me that broke down halfway across PA and into "Who Is He and What Is He To You?" and the entire 4th Wave Emo Revival scene that I downloaded onto my phone. Fortunately, Misty didn't have any trouble driving 80mph, so we made good progress on the road and even cut down our ETA by almost an hour.
Good thing, too - by hour 6, running on no sleep, 2 cups of coffee, a cold bean burrito from Taco Bell, and a few oranges Roxy gave me, I was forcing myself to stay awake by spouting the ABCs backward and failing. Soon enough, I couldn't even spout the ABC's forward - unless we count "googaba" and "dilly-doo-dee" and other gibberish syllables my half-melted brain could string together. I was forced to stop at the parking lot of a motel on the PA-Ohio border, sleep for 15 minutes (which was all I could spare), and keep driving on.
Those 15 minutes made all the difference - by the time 6am rolled around, the sun started to come up, and the sun rose up over the horizon behind me, cheering me on as I made my way back home. Finally, with 2 gallons of gas and 20 minutes until the start of the Palm Sunday service to spare, Mystique and I made it back to Dayton - no one was there to wave palm leaves for us as I made my triumphal entrance on the back of my ass, but that's OK. I need no one's validation but God's now.
Overall, Misty performed admirably, and she played nice with another driver at the wheel. I'm proud of her. Now that we're back, we still have some work to do - namely, so work involving her valve cover gaskets and her brakes - but now that I have access to the Chilton manual through my library and a torque wrench from a garage sale, we'll face these challenges with the confidence that we can do anything, if only we love each other enough.

NEXT TIME ON ↝GARAGE ✯ MYSTIQUE↜:
Mystique gets some new cosmetics, and a grim diagnosis! Also, I pull the hoverboard apart even more, in service of creating an E-Bike - I will even have pictures to show! Keep your car tuned-up, and yourself tuned-in!

PART 3


Boston is full of EVs. Priuses, Teslas, Nissan Leafs, even an electric muscle car! It must have been every 5th car that was an EV. Of course, to support all of these, Boston was chock full of EV charging stations too. There must have been 4 or 5 stations in the 12 block stretch of Boston Roxy and I explored, each with 6 charging "pumps." What a far cry from Dayton! There, fossil fuels reign supreme. It's strange to see the amount of support for EVs in Boston, but then again, Bostonians must think it's weird to drive a car that uses dead dinosaurs (or what's left of them) as fuel. It's almost like riding a dinosaur yourself. Makes me feel like Fred Flintstone.
Unfortunately, Roxy and I did not take any EVs to get to the convention center. No, we braved the stiff and salty breeze from the Boston Harbor on our way, passing by the Chinatown gate and the Falun Gong lady who was pristinely still in meditation, the subway entrances that were domed in pyrammids of glass like the Louvre, the train station whose metal details were tarnished by regular use starting from the 19th century, the skyscrapers that glinted like long shards of obsidian in the mid-day sun, five Dunkin' Donuts, and the bridge over the harbor. After we crossed the bridge, we were accosted by a scalper who wanted to sell us tickets to PAX (we already bought those) and an Obama Foundation volunteer who wanted to sell us Hope and Change (we already bought into those). Between the two of them, I think the scalper's offer was more tempting, even if his salesmanship could use some work. At least we didn't know if PAX East would disappoint yet.
It didn't. PAX East was HUGE. It was GIGANTIC. It was HUMONGOUS. The entire convention center (and I mean the ENTIRE convention center) was stuffed top to bottom with gamers, cosplayers and developers. The main lobby swallowed us up in excitement, and the bustling crowd muscled us out into the great expo hall. The expo hall was like a massive canyon-sized swimming pool, with all of its water drained and replaced with TVs and laptops and gaming consoles of every type. It seemed like the entire game industry was there. Nintendo was there. Atari was there. The guys who made Psychonauts were there. And behind all of these industry giants were all of the indie games and publishers. I definitely wasn't going to get any job offers from Nintendo (and getting a job was the whole reason I was there anyway), so I went over to the indie games.
The first game I played was Barony, which is a voxel-art roguelike RPG. It was fun - I liked the voxel art, because it actually looked good and well shaded. Unfortunately, the developers already had a sound guy, so I looked for other games.
I played through some other games as well - there was a cute game made by some university students called "Potted Pets," a roguelike single-player fighting game, and a cool little open world game called "A Corgi's Cozy Hike." All of them already had sound guys.
After playing a couple games, Roxy and I attended a few panels - there was one called "The reality of the Indie Game Industry," where a few industry vets made predictions and basically told us to stick together and buy each other's games and give each other money. Kind of hard when I barely have any money in the first place, but OK. I hope I end up on an indie game that makes a ton of money - that would be cool. I've been part of far too many passion projects to trust these mantras of "make something you love and you'll be successful!" If that were the case, then everyone working in games would be rich - who hates video games??
After a couple more games - including a very brainy physics based puzzle game whose name I forgot, and a cute little metroidvania called "Bolt & Whalington" - Roxy and I were ready to eat. We again braved the cruel Boston wind and settled in a vegan Thai restaurant in Chinatown. I got a vegan Pad See Ew with all of the vegan meats and Roxy got a Chow Mein with all of the vegan meats. The Pad See Ew was probably the vest vegan good I had ever tried - the vegan chicken and beef were almost identical to real beef and chicken. The only disappointing thing was the vegan shrimp - not even Asian vegan technology has been able to replicate shrimp yet.
Roxy and I didn't talk much during dinner - maybe she could tell that I was getting frustrated by the lack of opportunities I was finding, or maybe I was just frustrated by the lack of opportunities I was finding. Either way, our silence was the kind shared by two people who have nothing else in common.
We had one more thing to go to before we went to bed - an LGBT gaming group meetup. If there was any chance I was getting a gig, it was here.
After waiting in line for the entirely wrong thing that was nearby (it turned out to be some signing event for a guy who looked like Luigi from Super Mario crossed with Dr Disrespect), we went into the room where the meetup was, and the first thing we had to do was put on a name sticker and pronouns sticker. And there was my problem.
I don't like letting people know certain things about myself. I don't think it's conducive to business, especially in Dayton. But now, admitting this would be the only way I'd have a prayer of getting something out of PAX. I thought about my image - my identity - who I am and how I was supposed to maintain it. And then I thought of all of the nerds I had encountered on my way to PAX - Roxy, whose nerdiness helped me get into doing sound effects in the first place; the nerds on Roxy's DnD podcast, who were having fun even if they were being embarassing; the EV drivers, without whom those charging stations and all of the infrastructure that could help save the environment wouldn't exist; the industry vets at the panel, who keep making games even if the industry takes a turn for the worse; every single developer in the expo hall who put everything on the line to put out a a game they love; and the nerds who started PAX in the first place, for the love of the art of video games. At the heart of nerd-dom is love. If everyone was cool and no one was nerdy, nothing would ever get done - no careers, no games, no expos. And the first step to being nerdy is being honest.
So yes: I, Xtine, am transgender. There is no need to hide who I am; who I am is beautiful and worthy.
The rest of the night was spent with the queer gamer group talking about games and learning about who was developing what. There was a visual novel that someone else was making that I was very intrigued by - a visual novel that I will be working on. Then, back at the hostel, I smoked a joint outside and listened to all of the conversations happening on the streets of Boston - in English, Spanish, Vietnamese, Japanese, Chinese - and marveled at how everyone was weird and everyone was beautiful.
PART 4 COMING SOON!

PART 2


Roxy's parents remind me of my own - down to even them owning the same bougie white mug set with the butterflies that my parents do. There's just something about it that makes upwardly-mobile immigrant parents feel accomplished. Maybe that's why we didn't have much to say the next morning besides the bare niceties of "thanks for letting me stay for the night" "dinner last night was really great" "what do you do for work". They're both Doctors who have Big Plans for their kid and Do Not expect Disappointment any time soon. Maybe they should've - I don't usually make my bed when I'm staying at my parent's place, either, but I think becoming a disappointment as soon as I got out of bed has to be a new record. Last set of immigrant parents whose place I slept at, it took me 19 years! (And yes, I'm sorry for not making the bed :_C)
I never liked sleeping in my parent's house anyway. While I called it home, the heaviness in the air made every room claustrophobic, but now that my brother is in another state and I live on my own,all that heaviness just feels empty now - like the stale air of an empty office building, achieving nothing but hard-water stains around the water cooler. The room I was staying in this weekend was Roxy's brother's room that was vacant now that he is off to college - no clothes remained in his closet, and his walls were unadorned but for 1st place academics medals and pictures from youth math leagues. I'm sure someone is getting some satisfaction out of those in his absence.
As Roxy and I left, we made sure to get some more essentials, such as the souvenir fridge magnets she got me from her trip to Kenya! Aren't they so adorable? We also got a few fruits and bottles of water for the road, because the drive today would take us 5 hours.
Since my feet were hurting like crazy from driving 9 hours yesterday, I drove the first two hours, up North to New York. I can remember the exact moment we entered New York - we got to a fork in the road and there was a big circle of colored stones arranged to look like one of those cheesy "I <3 NY" souvenir buttons you'd get for someone who you promised to get a souvenir for but don't really know what to get them. I reflected on how weird it was to see a New York thing in PA until we passed by it and my maps app said "Welcome to New York." I just couldn't believe it was so quick to get from PA to New York, but I haven't really left Dayton on a big state-lines-crossing road trip since Philadelphia last year in my old car (who I've posthumously dubbed "Nightmare"), and crossing Ohio to get to PA took me like 4 hours.
Well, my toe started to become numb (an old Karate injury) so Roxy took over. She said that Mystique felt a bit "grindier" than her car, a very practical Hyundai sedan with a new transmission and fresh brakes. I told her that Mystique could NOT go above 80 per hour on the highway, for fear that the valve cover gasket would blow up. We spent Hartford on the general niceties of "what jobs are you looking for" "who are your friends back home" "which games are you excited for at PAX" as she played her Kendrick Lamar playlist. She really wanted to check out Critical Reflex's booth - they published all kinds of indie horror games like "No, I'm Not a Human" and "Buckshot Roulette." She's hoping she can get her game published by them too. As for me... I was just excited to find the first game dev who would give me work making music. Worcestor we drove by without words, except for Roxy's DnD podcast where a couple of nerds made cringy accents silly stories for no reason.
Our hostel was in the middle of Chinatown, and looked very much like what you would imagine a hostel wouldn't look like. It was pretty swanky, with a nice big lobby with a piano for anyone to play, common kitchen facilities on the second floor, and even a shower that told you how much water you used! Chinatown itself looked less like how the Qing dynasty-style gates would have you believe and more like present-day China, with trendy hotpot restaurants and boba shops intermingled with fruit stands, parking garages with downright Anti-Euclidean parking spots to squeeze into, and 1st floor wig stores with vegan Thai restaurants on the second floor. A weird city indeed.
Roxy and I somehow parked Mystique at the parking garage (skinny legend!!!). All that was left to do was attend PAX East.
PART 3 COMING SOON!

PART 1

One of my favorite emo bands, Merchant Ships, once sang:


Hey! Let's leave home and go to New Jersey
Six hundred miles away from our problems
Let's be happy
Vomit from our fucking mouths
Bile in our throats
Let's not come back


Now I don't know about the last 3 lines, but I will say this: Mystique and I definitely needed to run away from our problems, at least for this good weekend, and to what better place than Boston, Massachusetts, to attend one of the biggest video game conventions in the world with my friend?
I am talking, of course, about PAX East. Since I make music for video games and my friend codes, it was the perfect excuse to pay her a visit and to really test Misty's mettle. A-dawg and I had previously given Misty a tune-up, and the weird acceleration issue only ever happens when she starts, so I thought she was ready for a real test.
I left on Thursday afternoon with my suitcase packed with 3 cute outfits, concealer, an orange eyeshadow palette, liquid eyeliner, pink lip gloss, pink lip liner, toothbrush and toothpaste, a towel, 25 business cards, an extra pair of shoes, and an extra jacket in case it got cold in Boston (which it did 😭), a sleeve of saltine crackers, some Chinese tofu snacks, and a few bottles of water. In other words, I packed light.
I come from Dayton, so first I filled up at a gas station (and paid enough for a fill-up to turn even the most ardent war hawk into a pacifist). Then, I went on I-70 East, towards Columbus.
In Columbus, I decided to visit a trans woman and drag queen centered fashion boutique called Glamazon Jayne's, because the friend I was visiting, Roxy, needed cute shoes. After suffering through looking for free parking (which will be a recurring theme this weekend), I was rewarded with a $39 pair of size 13 flats and some light flirting from the cashier. Afterwards, it was time to hit the road again!
I-71 and I-270 was boring, except for a brief and evil glimpse into a car-dependent future at a Petro "stopping center." It was like a shopping mall, but parked at an exit in the middle of nowhere known as Girard,Ohio so the only way you could get there was by driving. There was, of course, a small restaurant and a corner store. There was also a laundromat(?) barbershop(??), and movie theater(???). The people there were nice, but I knew I had to leave before I let my curiosity get the better of me and watched a movie.
Back on the road, and on the OH-PA border, I got stopped at a traffic jam. Boo!!! There was a light rain, too, which was kind of yucky. As I sat, however, the rain cleared up and I was met with a rainbows. It wasw so I could almost touch it, but as soon as I got close enough to the end of it, all I could see was what was there before - the damp earth, the near-green grass, the piss jugs that some truckers threw out their cabs. So it seems with every rainbow. The only proof it was ever there was the rain leftover on the blades of grass - that, and this picture I took.
After a few more uneventful turns on the highway, the rain stopped being cute and started being menacing, and it was at this point that I wished I had bothered repairing Misty's windshield wiper arm. Right now, the spring that keeps the arm on the car is gone, so all I could do was look out the passenger side of the windshield and pray that the rain would not overtake us. Fortunately, we weathered this storm and got to Scranton to meet up with my friend Roxy at her place in Scranton to stay the night (btw Mr and Mrs Roxy's parents, those Kenyan rice and beans and cabbage were really good!!!).

SATURDAY 3/21/2026

Previously on ↝GARAGE ✯ MYSTIQUE↜...

Mystique now runs beautifully (except for the transmission fluid leak, burnt spark plugs, engine oil leak, melted coil wires, chewed up battery wire, squeaky belt when turning and bad brakes) but fortunately, all we have is time to fix her. I will update the public on what her current MPG is after the tune up, but I am DEFINITELY not looking forward to the next fill up. Maybe I'll strike a blow against the war machine and convert her to a hybrid?
    TOOLS USED:
  • 10mm socket & Ratchet Wrench
  • 6 inch extension and 3 inch extension
  • Spark Plug Socket (5/8ths inch)
  • Phillips Head Screwdriver
  • Gapping Tool (the one that looks like a coin with a hole in it)
  • PB Blaster or equivalent lubricant
  • Rag
  • Dielectric Grease
  • Mass Air Flow Sensor (MAF) Cleaner
    PARTS NEEDED:
  • 6 spark plugs (Champion 7034 or equivalent)
  • 1 spark plug wire set with 6 spark plugs (Standar Motor Products 27664 or equivalent)
  • 1 ignition coil pack (Standard Motor Products UF53 or equivalent)

Jack Up? ✖

Mystique has been DYING for a tune up. Literally. About a week and a half ago she got a Check Engine Light. Actually, that downplays the situation. It's more like she started bucking like a horse stung by a bee, and I had to pull her off the highway and limp her over to my buddy A-dawg's place for her to diagnose. As it turns out, she's just like her mama - she's soooo problematic!!
Her biggest issue is her leaking valve cover gasket. She's been sweating oil, and that might be the cause of the weird shifting/power loss problem I keep having when I drive her cold (I had her checked at a transmission shop and the transmission guys said that there was nothing wrong with her there, so it's probably an engine thing. Probably.) Problem is, her engine has so much shit in the way of the valve cover that I'd need to remove, so that will have to be a repair I make later.
Her next and most urgent problem is her spark plugs, wires and coil pack. I couldn't get any pictures because my phone doesn't want to take pictures anymore (whatever - I'm trying to use my phone less anyway), but the spark plugs that she had were YUCKY. Like white soot everywhere kind of yucky. The root of the check engine light was, of course, lucky number 4 - that is, cylinder 4. There was a massive misfire or something that happened there and the wire was actually half-melted.
So, she was obviously due for a tune-up. I have the parts list above, but I got a new coil pack, spark plug wires, and spark plugs. I sprung for platinum plugs, because I only get the best for my girl (and for you car geeks saying "but what about iridium???" 😘 eat me. I have to replace the valve cover gasket anyway so this is lowkey kind of a temporary fix LOL)
First, what I did was let the engine cool down. I don't know about you, but I sure don't like burning my fingers off when working on my car. It ruins my nail polish. While it cooled down, I disconnected the negative battery cable of the car with a 10mm socket and wrench.
After the engine cooled down, I took the beauty cover off the engine and the wires, and then I disconnected the air filter hose. This let me access the coil pack, and then I got to work.
The cylinders have a very specific order they fire in, and if you don't match the cylinders to the right wires and the right wires to the right coil on the coil pack, you are going to have some real problems (like crazy misfiring problems). This is how the coils are arranged on the coil pack, assuming you're looking at it from the side with the front of the car facing right:
Plug that connects to the battery on top
6 4 2
5 1 3
I took off the plugs on the old coil pack (and using my new coil pack as a placeholder so that I didn't lose which wires were which). Then, I took off the old coil pack with a 10mm socket. After that, I transferred all of the wires to the old coil pack while I put the new coil on. Then I put the wires back on the new pack. That's the coil pack done.
Onto the wires and spark plugs. This is by far the most annoying part of the whole process. The original wires are covered in this plastic hose that are supposed to protect the wires from heat, but really just get in the way of removing them. I got rid of them, and then one by one, took them out by removing the spark plug end first, then taking off the coil pack end off the coil, and then threading the coil end through the little space I have in under the big metal frame on top.
This is the way the engine cylinders are arranged, assuming you have the front of the car to the right:
6 5 4
3 2 1
MAKE SURE that the wire lengths between the old and new wires match! Otherwise it'll be annoying to replace them and you'll have misfires.
While I was removing the wires, A-dawg was taking the spark plugs out by carefully taking her 5/8ths socket with a 6 inch and 3 inch extension and unthreading the plugs, then fishing them out with a magnet. Then she put the new ones in by placing the coils in the wells and screwing them in to 9 foot-pounds of torque.
Finally, I plugged the wires back in by threading the coil end through the top of the engine and putting each end where they're supposed to go. You should hear a "click" sound every time you push in one of the ends. If you don't, then you'll have engine misfires because the spark won't travel through the car. Don't make my mistake!!!
After it was all said and done, we packed everything up, arranged the wires so that they wouldn't get shredded by the accessory belt, and took Mystique for a test drive. And...
We got a check engine light.
Cylinders 1 and 2 weren't firing. A-dawg and I thought the wires might be bad, so I replaced wires 1 and 2 with the originals. No luck - we still got a check engine. Turns out, it was because I didn't put them in all the way and the connections weren't clean. So, I replaced wires 1 and 2 with the new wires and sprayed all the connections with MAF cleaner and PUSHED each end in until I could hear a click. Unfortunately, wire 1 decided to be ornery and the rubber boot actually traveled up the connection, which is no bueno. I'll probably have to replace that at some point.
Finally, after switching out wires, cleaning out connections, switching the wires AGAIN, cleaning out the connections AGAIN, making A-dawg late for her hot date (sorry babe!!) and pushing in the connections so they clicked, I FINALLY got rid of my check engine light, and now Misty runs PERFECTLY!!!
...
OK, not really. She's stilllll having that weird power loss thing if I don't warm her up enough. I'm starting to think it might be the valve gasket cover issue, but it could also be cylinders 1 and 2 being jerks. Whatever - I'll get it fixed, but at least when she's hot she can GO now. I'm now back on the highway being a menace and trying to match speeds with every muscle car I see LOL. Misty has some of her joie de vivre back. Hooray!!!

NEXT TIME ON ↝GARAGE ✯ MYSTIQUE↜:
Mystique and I hit the road to Boston. I also got a free Hoverboard, so now I am investigating E-Bike schematics. Stay tuned!

SATURDAY 3/14/2026

    TOOLS USED:
  • Scissor jack and 1 jack stand
  • Flathead Screwdriver
  • Hammer or small pry bar
  • 10mm socket & wrench (very optional, use only if your fuel filter is seized)
  • Small bucket or tray to catch any fuel that drips
  • A little bit of clean engine oil
  • Rag
  • PB Blaster or equivalent lubricant
    PARTS NEEDED:
  • Fuel Filter (Duralast FF610DL or equivalent)

Jack Up? ✔

First post!!! So exciting lol and this is my FIRST solo repair (my friend A-dawg supervised me when I fixed my oil pressure sensor, so that one lowkey doesn't count LOL) so I think it's about time I started putting a record of my repairs here.
Mystique has been drinking gas like crazy (maybe that's why her drive belt wouldn't fit LOL) and with the Iran War jacking up gas prices (among other things... hope you'll be safe Nate), I figured it was time to look at some way to improve my MPG and not have to buy as much gas.
First thing I did to replace the fuel filter was to get a fuel filter in the first place. Since Mystique is a first gen Intrepid, I got the Duralast FF610DL fuel filter, which ran me 5 bucks at Autozone.
Next thing to do is to get rid of the fuel pressure. Since the fuel line is pressurized to shoot gas through the lines and into the engine, if you don't depressurize the fuel system, you WILL get fuel spurting everywhere. And trust me, it is NOT fun to have to clean fuel out of clothes.
To depressurize the fuel system, I first took out the fuel pump relay. It should be the big one in the top middle of the fusebox under the hood - the diagram on the underside of the fusebox lid tells you where it is. Then, I cranked the ignition to clear out the fuel in the line. The car should NOT start; if yours does, turn the car off and crank again. It should just turn over.
After depressurizing the fuel system for about 15 seconds, it was time to do the real work. The fuel filter is under the car, near the rear passenger side wheel. The nifty thing about Mystique is that she has little nooks to put the jack stand on, so I jacked her up with my scissor jack and then put her on one jack stand.
After that, I crawled under Mystique and took a look at what I was working with:
The fuel filter underneath didn't look all that bad - Misty only has about 85,000 miles on her, so that's not a big surprise, but the fuel lines didn't look too hot. I sprayed the lines with PB Blaster for rust protection and got to work.
First, I disconnected the inlet line - that would be the line that the smooth side of the filter is pointing to. You need to be delicate with this one - all that I had to do was push on two little plastic buttons on the plastic insert part. You should see the insert disconnect from the hose end's housing. At this point, slide the hose off.
NOTE: Make sure to put some kind of tray under the hose to catch any gas that drips, and MAKE SURE that you keep the gas away from you so that you don't accidentally cover yourself in gas! I knocked over the tray I used and I had to SCOUR my jacket to get rid of all of the gas. It still very faintly smells like gas, but a day and a half of evaporating outside, 6 preliminary washes in the sink with lots of dish soap, and 2 cycles in the washing machine did the trick.
The outlet line was way harder to remove. Theoretically, it should just pop right off since the only thing holding it on is a plastic piece and some kind of tongue mechanism in the line, but no matter how much PB I hit it with, it would not budge.
Eventually, I just had to take it off the black plastic ring that holds the filter in the middle (which you do by taking off the 10mm bolt keeping it on the chassis) and pried the filter from the line with a screwdriver and brute strength. I did this weird chicken wing maneuver where I put the screwdriver between the outlet line and the filter, put the screwdriver handle and filter in my armpit, and squeezed as hard as I could. After 5 hours of fiddling around and the little black plastic housing that came with the outlet line breaking off(!), I finally got the filter off.
Putting the filter back on was way easier. I rubbed both ends of the filter with some clean engine oil (in my case, 10w-30), stuck it in the black plastic holder and bolted the holder back onto the chassis again. Then I stuck the lines back on the hoses again. MAKE SURE that the plastic insert that comes with the inlet side of the filter CLICKS into the housing, otherwise gas might leak.
After everything, I jacked Mystique down, cleaned up my work area, put the fuel pump relay back in the fusebox, and started the car. After about 3 seconds of her turning over, she started and there were NO leaks from the fuel filter as far as I can see.
Mystique now runs beautifully (except for the transmission fluid leak, burnt spark plugs, engine oil leak, melted coil wires, chewed up battery wire, squeaky belt when turning and bad brakes) but fortunately, all we have is time to fix her. I will update the public on what her current MPG is after the tune up, but I am DEFINITELY not looking forward to the next fill up. Maybe I'll strike a blow against the war machine and convert her to a hybrid?

NEXT TIME ON ↝GARAGE ✯ MYSTIQUE↜:
A-dawg and I perform a tune-up on Mystique. Stay tuned!

Sign My Guestbook!

JUNKYARD


ROADMAP

  • Cincinnati Airport
  • My Job (an hour late)!
  • Boston!
  • IN MEMORIAM

    In Loving Memory Of

    NIGHTMARE
    My first car, a black Chevy HHR in poor condition with half of the bumper missing.

    2022-2025